ExamSoft is a secure testing solution that is used for high stakes exams. This software enables secure testing on student computers by blocking access to programs, files and Internet usage during the test. ExamSoft is not dependent on an internet connection while testing, which allows it to be used almost anywhere a laptop can be used. The client (vendor) used for testing students is Examplify.
Available to: Faculty | Students | Staff
Managed by: Education Technology
Funding: Institution
Authentication: SSO (BCM Username and password)
Create Assessments
Import and bank questions, tag them to learning outcomes, and author exams all in one easy-to-use intuitive portal.
Administer Assessments
Deliver assessments to virtually any device, administer exams offline for a secure testing environment, and grade instantly.
Analyze Assessments
Instantly grade exams and make informed decisions on curricula and student remediation with real-time student performance data.
To Request an Account:
To get access to ExamSoft, contact Ed-Tech at ed-tech@bcm.edu.
- The SOM/SHP Admin (or Course Coordinator) must submit a Service Now request for a New ExamSoft User.
- List in the form description what the user needs access to and access level (read-only, create/edit, approve, full access).
- Once the form has been submitted, the request will be evaluated by Ed-Tech. If approved, the user will receive a confirmation email from Ed-Tech.
Existing Account Holders
To log in to ExamSoft,
- Open a web browser. Google Chrome (version 101+) or Firefox (version 21+) are the best browsers to use. ExamSoft will not work in Internet Explorer.
- Navigate to https://www.examsoft.com/bcm.
- Log in under the Administrators / Faculty section click the Login button and use your BCM username and password to authenticate.
- Get Started with Examplify (Video Guide)
Logging in: Use your BCM username and password for access.
(Note: If you have forgotten your password, please contact the BCM Helpdesk at 713-798-8737 or visit https://bcm.edu/myaccount) PDF: Microsoft Self-Service Password Reset (SSPR)
- Go to Creating Questions
- Go to Creating and Posting an Exam
- Go to Disable Operating System Auto-Update
- Go to Exam Statistics and Analysis
- Go to Scoring Exams
- Go to Releasing Results to Students
- Go to Reviewing Results
Exam Taker Resources
- ExamID and ExamMonitor from the Student Perspective
- Examplify: Clear the Registration on Your Device
- Examplify: Downloading for Windows & Mac
- Examplify: Download or Remove Exams
- Examplify: Installing and Registering
- Examplify: Get Started with Examplify (Video Guide)
- How Students Access their Exam Feedback
Materials and resources for this area are being developed by the Office of Academic Technology: Education Technology. They will be added to this section as soon as they are ready.
We've got your back.
Go to the link below to submit a form to resolve an issue. Log in using your BCM username and password for access. Select ExamSoft, then select Issue or Request. For questions, contact Ed-Tech.
Submit an Ed-Tech Form.
View the Examplify Troubleshooting Guide to help with issues.
Examplify (Examsoft) Support
If you are having issues with your Examplify software of the Examsoft portal, students can reach Examsoft by phone at 866-429-8889 for the fastest support.
You may also email support@examsoft.com or start a chat from the website examsoft.com/support.
GETTING STARTED: Students / Trainees
Use the resources below to prepare for and complete your exams successfully:
Prior to downloading Examplify, check that your device meets the Minimum System Requirements.
- To download Examplify, go to
- Examplify: Installing on Windows and Mac Devices
- Examplify for iPad: Downloading and Installing Examplify
- Depending on the student’s browser, Examplify will download in one of three places. If they do not see it on their screen, open the browser’s Download tab, and locate the Examplify download.
Run the installer file. Once the installation is finished, they will be able to launch the application from the Desktop or App tray. Next, launch the application. The student must be connected to the internet to register their copy of Examplify and/or download exams.
Mock Exam Information
- Mock Exams launched by Ed-Tech:
- Fall or Spring Mock Exam: This mock exam has ExamID and ExamMonitor enabled. If your school or program is not using ExamID or ExamMonitor, then you don't need to complete this mock exam.
- New Student Orientation Mock Exam: This self-paced mock exam is launched only to the incoming students to become familiar with the features of Examplify.
- Download Start: Beginning of Semester
- Number of Downloads: 10
- Resume Code: Contact Ed-Tech or the School/Program
- Download End: End of Semester
- Password: Welcome25
Once you have Examplify downloaded, log in using your BCM username and password. The Mock Exam will be ready to download.
Students and exam-takers downloading the test-taking software, Examplify, should review these Minimum System Requirements (MSRs) to ensure their devices are supported. Examplify works with most modern computers, both Mac and Windows operating systems. To keep Examplify current in the rapidly evolving market, when new technology is introduced, Examplify works hard to timely implement updates that accommodate changes in technologies. It is not always possible, however, to support all hardware or software, unless and until we test and certify updated technologies, including chipsets and operating systems. ExamSoft Minimum System Requirements website.
We've got your back.
Go to the link below to submit a form to resolve an issue. Log in using your BCM username and password for access. Select ExamSoft, then select Issue or Request. For questions, contact Ed-Tech.
Submit an Ed-Tech Form.
View the Examplify Troubleshooting Guide to help with issues.
Examplify (Examsoft) Support
If you are having issues with your Examplify software of the Examsoft portal, students can reach Examsoft by phone at 866-429-8889 for the fastest support.
You may also email support@examsoft.com or start a chat from the website examsoft.com/support.
GET STARTED: Faculty / Staff
Use these resources to manage and administer assessments:
Note: You also can add exam-takers by importing a file from that you created for this purpose. See: Legacy Portal: Import Exam-Taker and Course Information
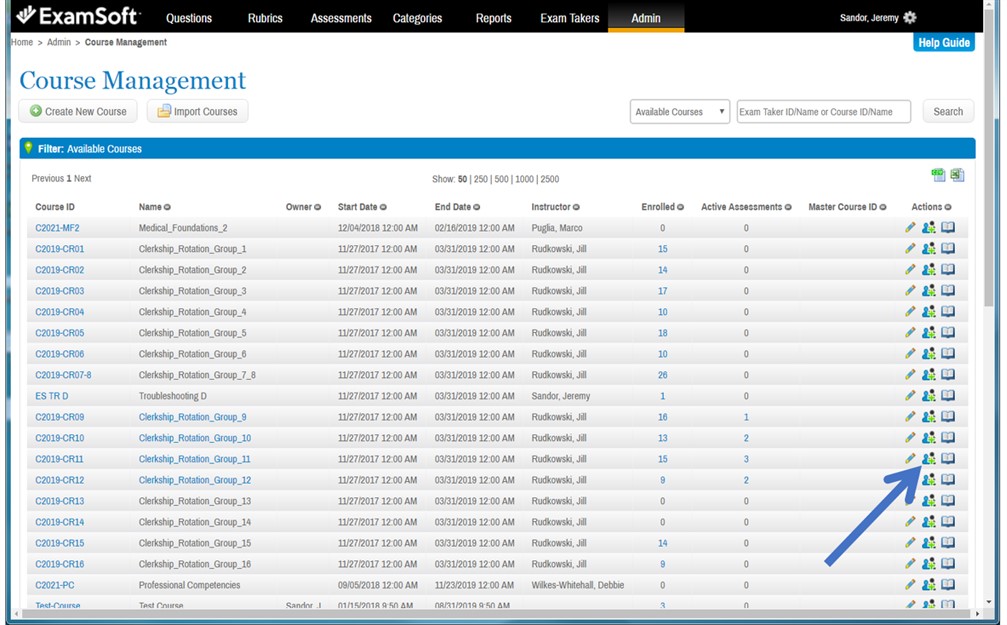
- Select the Admin menu, and then select Courses. [view screenshot]
- Scroll or search to find the course.
- In the Actions column (near the right side of the screen), select the people icon. [view screenshot]
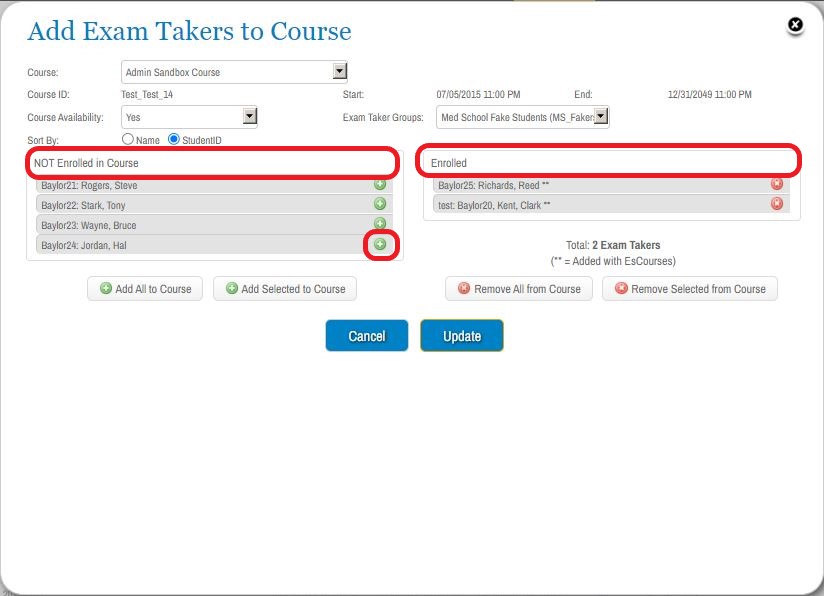
- In the NOT Enrolled list, select the plus icon for each exam-taker to add to the course. [view screenshot]
- The selected names will appear in the Enrolled list on the right side of the pop-up window.
- Note: You might have to scroll right to see the plus icon and the Enrolled list.
- To select a different course or exam-taker group: Use the filters at the top of the pop-up window.
- To select multiple exam-takers:
- Select a name in the NOT Enrolled list, and hold the Shift key while selecting another name. Now those names and all names in between them are selected.
- Select the Add Selected to Course button (below the list).
- To add all exam-takers: Select the Add All to Course button, which is located below the NOT Enrolled list.
- To remove an individual exam-taker: Find the individual in the Enrolled list, and select the X icon.
- To remove multiple exam-takers:
- Select a name in the Enrolled list, and hold the Shift key while selecting another name. Now those names and all names in between them are selected.
- Select the Remove Selected from Course button, (below the list).
- To remove all exam-takers: Select the Remove All from Course button (below the list).
- Select Update to save your changes.
- Close the pop-up window.
Materials and resources for this area are being developed by the Office of Academic Technology: Education Technology. They will be added to this section as soon as they are ready.
Until then, content can be viewed here:
If the student has already consulted with Student and Trainee Disability Services and has an accommodation letter to submit for ExamSoft Admin, visit the Ed-Tech Forms page.
- Select ExamSoft under Applications
- Select Request under Request Type
- Choose the ExamSoft Accommodation Request form and submit your request.
Note: The student's accommodation will be applied to all future exams once it has been applied to your ExamSoft account.
Remove the downloads from the student; then, create a duplicate linked exam and assign it to only that student. Be sure to view combined reports after all students have finished their exam.
TROUBLESHOOTING
Login Issues
- Verify that the user has an ExamSoft account
- If an account is present, then all login issues (BCM uses SSO) go to the BCM Help Desk at 713-798-8737.
There are some common issues related to browser choice and login information that can cause an error message when trying to log into ExamSoft or Examplify.
Faculty and staff can follow this checklist to try and resolve the issue:
- Are you logging into ExamSoft using either your Chrome or Firefox browser? ExamSoft works best on these two browsers
- Is Caps Lock off? The Username and Password fields are both case-sensitive.
- Are you typing only the unique portion of your ECA (BCM Username)?
- Ex. username@bcm.edu would only enter “username” into the LDAP ID field.
- Note: You get three chances to type your password correctly. On the fourth try your account will get locked. If you stop and wait 15 minutes, it will automatically get unlocked. If you keep trying, your account will permanently get locked and you’ll need to call the BCM Help Desk (713-798-8737) to unlock it.
- Have you ever changed your BCM password? BCM passwords must be changed via https://bcm.edu/myaccount, then try logging into ExamSoft or Examplify.
- If you are still receiving an error message, ed-tech@bcm.edu
This error message is usually associated with Mac computers. Students will sometimes be logged into multiple computer profiles on their Mac. To ensure exam security and to maintain the integrity of the software, only one local user can be logged in at a time. Students Should:
- Log out of all computer profiles
- Restart the computer
- Log back into the main profile and log into Examplify.
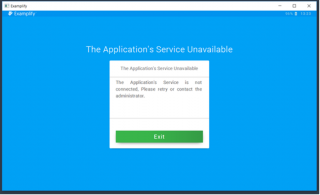
So you’re all ready to rock this final, you’ve studied, have a stupendous outline, now all you need to do is type this essay portion and you’re practically on summer break. You double-click on the Examplify icon to launch the program and watch the load screen run up to 50% and then BOOM… you get a warning that says “The Application’s Service is Unavailable, retry or contact your administrator.” [view screenshot]
But it’s going to be OK! All you need to do is follow the below steps and you will be back up and running in time to still own this final!
Step1: Right click the Examplify icon on your device, from the menu options, choose Run as Administrator. That’s it, this should fix the problem for most users. However, if you receive the same error message, proceed to Step 2.
Step 2: Navigate to the Services Console [view screenshot]
Click the Start button and type in “Services” in the search field for the local services application. Launch the application
Step 3: Restart the ExamplifyService
In the Services application, find the item named ExamplifyService
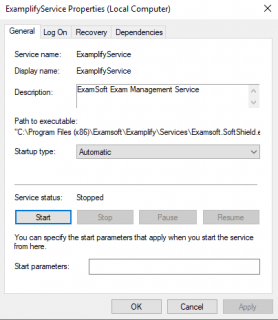
Step 4: Double click the ExamplifyService. This will open up a new window. Ensure that the Startup Type is set to Automatic. [view screenshot]
Step 5: Click the Start button on the left. After this service starts, Examplify will open as normal.
Note: If the service is not listed, you will need to re-install Examplify and/or check your antivirus settings to remove it from the quarantine.
MAC Users
If you find yourself in a similar situation with the same error message, or worse, your Examplify simply won’t launch at all and just bobs up and down without ever loading, then your solution is similar.
Step 1: Simply create a new user profile on your computer. Make sure the new user profile is set as an Admin (Administrator) – For instructions on how to create a new user profile, visit Apple’s support page for setting up new user accounts.
Step 2: Log into the new profile and launch Examplify.
That’s it!
Visit examsoft.com/support for additional information.
ExamSoft advises that Examplify users temporarily disable their anti-virus software and close all other applications before starting the assessment, in order to avoid technical errors from occurring.
When Examplify launches an assessment and a secure test-taking environment on a computer,
- Other applications are being closed until the user exits the assessment;
- Switching to another application is de-activated until the user exits the assessment;
- The computer’s internet connection is de-activated until the user exits the assessment.
When Examplify ends an assessment and the secure test-taking environment on a computer,
- Other applications closed by Examplify are re-opened;
- The ability to switch to another application is re-activated;
- The computer’s internet connection is re-established
Note: When Examplify launches or concludes a secure test-taking environment on a computer, it is typical for this process to take between 30 seconds to 2 minutes, depending on what other applications were left running on the computer.
Exam Download Issues
- Verify that the student is enrolled in the course
- Open the Test
- Go to the Exam Taker tab
- Verify that students are still able to download the exam through the Posting
- Have the student verify they are connected to the internet
- Have the student Clear their Registration
- Have the student restart Examplify
- If the exam still doesn't show up, have the student restart their computer
- If non of the above is successful, contact Ed-Tech
Report this to instructor; then, go in to the Post Settings page and change the download end time to the current time + 5 minutes, to give them extra time to download.
More information on Posting Exams.
- Give the student an extra download by clicking the plus sign next to their name in the proctoring tab. (Be sure to decrease the downloads to 0 after they have successfully uploaded their test.)
- If an additional laptop is available for the student to use:
- Make sure Examplify is installed and is up-to-date
- Verify that the anti-virus is disabled
- Have the student login and register (login instructions are on the student Examplify Page)
- An exam can only be downloaded to one device at a time. Instruct the student to remove the download on the previous device at the test is submitted.
ExamSoft only allows one exam file submission at a time. If a student has been approved to submit a second exam file, the first exam file must be deleted. Only the Admin can delete exam files.
Follow these steps:
- Contact the ExamSoft admin and/or Ed-Tech to have the first attempt exam file deleted.
- Confirm the file deletion (admin will get an email confirmation)
- Student can now take the exam again and submit the second exam attempt
- If the student submitted the 2nd attempt before the first exam was deleted, the student must manually submit their exam file. Instructions for how to complete manual upload are available.
- Confirm 2nd exam attempt in the portal.
- Contact Ed-Tech with any issues.
View instructions on how to complete a manual exam file upload.
Important
When manually uploading an exam file, the student must use the same computer that was used to complete the exam.
During Exam Issues
If during an assessment, Examplify freezes and it is no longer possible to use the mouse or keyboard, a hard reset of the computer is recommended: in most cases, this involves holding down the laptop’s power button until the computer shuts down, and then turning the computer back on.
Examplify should immediately re-launch, and Examplify logs a student’s responses as that person progresses through the assessment so that it is possible to continue sitting the assessment or exit, as desired. When the ‘Examplify Exam Restart’ window appears, select the RESUME button. Student may be prompted to input continuation code.
- Note: ExamSoft advises that Examplify users temporarily disable their anti-virus software and close all other applications before starting the assessment, in order to avoid technical errors from occurring.
- Note: When Examplify launches or concludes a secure test-taking environment on a computer, it is typical for this process to take between 30 seconds to 2 minutes, depending on what other applications were left running on the computer.
Device compatibility errors in Examplify occur when your computer’s hardware, operating system, or software configuration does not meet the strict baseline settings required to run secure assessments. These errors block you from downloading or starting an exam until the issue is resolved.
Common examples of device compatibility errors include:
- Unsupported Operating System: You will receive an error if you attempt to run Examplify on unsupported platforms, such as Chromebook, Android, Linux, or restricted versions of Windows like Windows 11 S Mode or Windows RT.
- Virtual Machine (VM) Detected: Examplify is blocked on devices running virtual machines because they can interfere with secure testing environments.
- Hardware and Settings Failures: You will see a "Minimum System Requirements" warning if your device lacks sufficient RAM, hard drive space, or if the screen resolution is set incorrectly.
- Unsupported Processor (ARM): On Windows devices, ARM-based processors may trigger errors if they are not running a specific version (Windows 11 24H2 or higher) with a compatible Examplify version.
- Missing Administrator Privileges: Examplify requires administrative rights to function properly; starting the application without them can cause the app to block the exam or fail to launch.
- Antivirus Interference: Overzealous antivirus software may quarantine necessary Examplify files during installation, triggering Microsoft Visual C++ or DLL-related errors.
As soon as students enter the password, the test will begin. To avoid this, you should not reveal the password until close to test time (an hour before or so), and remind students that they should not enter the password until test time. If they do, however, and it is well before the test is going to begin, you can do a MS Teams session with them, have them “start” the test as you watch, have them submit the test immediately so they leave Examplify and no longer have access to the test. Then, give them an extra download. Contact Ed-Tech so that the first exam submission can be deleted. When the student uploads the second time, there won't be any issues.
This occurs when a student has begun a test but for some reason has been inactive for a certain amount of time, or some other error message occurs. To find the continuation code, go to the proctoring page of the exam, enter the student’s code into the text box under “Continuation Code” and then click “Submit.” Give the student the continuation code. This must be done almost immediately, as the continuation code expires within minutes.
More Information on the Challenge Key (Continuation Code) Messages and Resume Codes.
More information on Issuing Resume Codes.
You should always ask a student why they need a resume code, as it usually indicates that they have left Examplify for a period of time. The universal resume code can be found on the proctoring page of the exam.
More information on Issuing Resume Codes.
Upload Issues
If a student’s answer file does not automatically upload after their exam, the student can manually upload so long as an upload deadline has not passed. View instructions on how to complete a manual exam file upload. Download deletion dates do not affect the answer file. Answer files remain on the student’s Examplify dashboard until the upload completes or until the app is uninstalled. If the student still has issues uploading their exam file to the ExamSoft portal, the student may contact ExamSoft by telephone at 866-429-8889 to have a support tech upload the file for them.
Examplify for iPad: Manually Upload an Answer File
Important
Student must use the same computer that was used to complete the exam.
- If student receives a yellow screen stating ATTENTION:
- If given the option to quit the exam during the yellow screen message, select ‘Quit’ and the exam will upload.
- If not, close the app and re-open it, and their exam will upload with confirmation.
How to resolve in Windows
Sometimes after an exam is closed, the computer has trouble turning network connections back on. Here are steps to manually turn them back on:
- Click on Windows button and search for Services
- Find DHCP Client in the list of services
- Set for Automatic and Start Services on the left sidebar
- Go to your network connections and try to reconnect again
- Make sure you are connected to the internet
- Open Examplify and try to resubmit the test again.
- Confirm on the ExamSoft website that the exam was submitted.
- Open the Exam
- Click on the Exam Taker Activity Tab
- A completed/submitted exam file will show up under the File Name column
- Sometimes, network connections take longer to connect the internet. Double check the laptop is connected to the internet.
- If not, try to launch Examplify again and follow directions.
- Restart the computer if exam wasn’t sent.
More information about Confirming an Answer File Upload.
Procedures
- Print the Exam
- Import the Answers
Print the Exam
- Select the Assessments menu (at the top).
- Find the posted assessment in the table, and then select the assessment name to open the Contents page.
- At the bottom of the Contents page and below the questions list, select Print/Export [view screenshot]
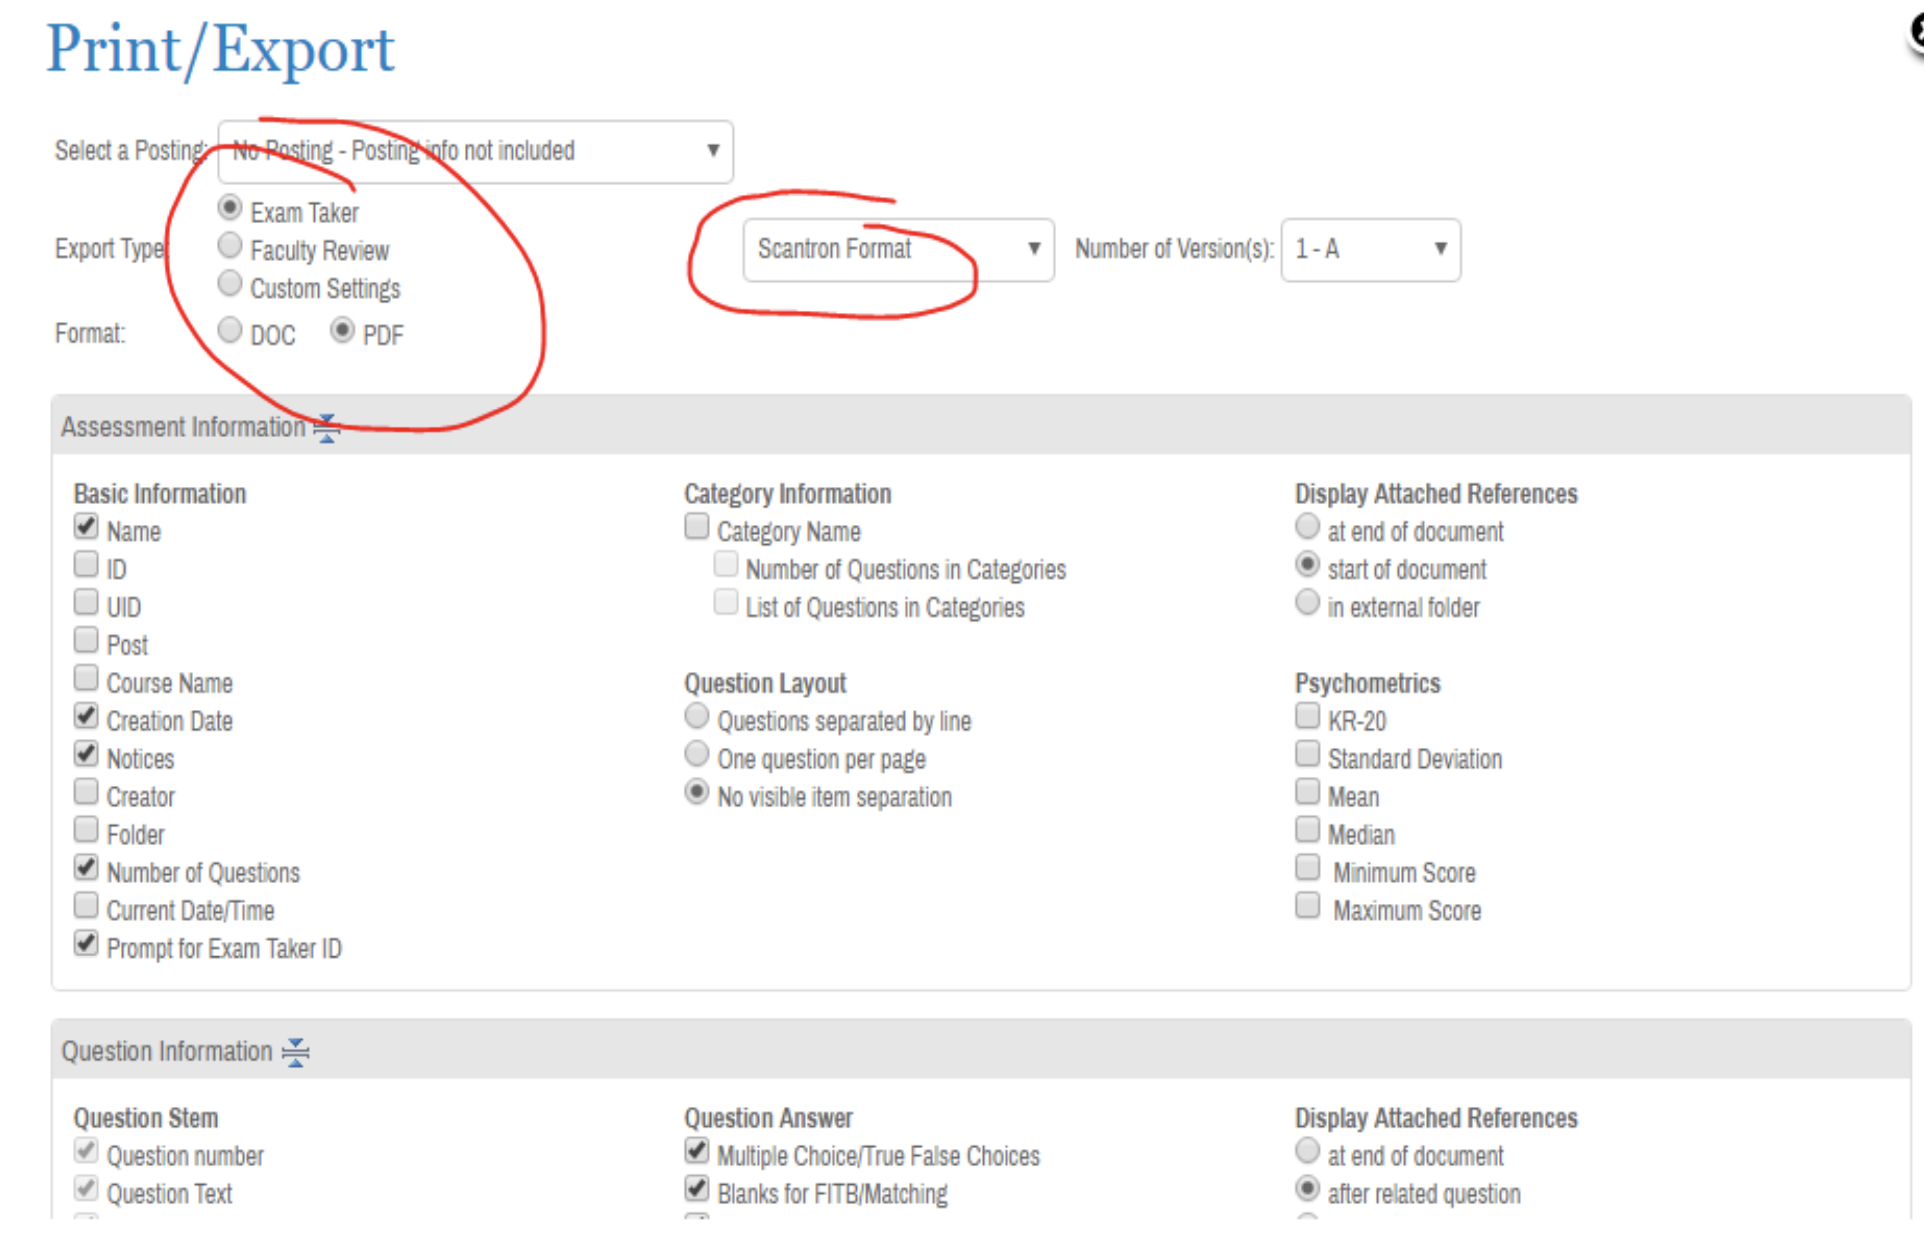
- In the Print/Export pop-up window, enter these settings:
- Posting: Select the posting.
- Export Type: Select Exam-Taker.
- Format: By default, Computer Based Format is selected. Change it to Scantron Format, and select the Number of Versions.
- Make sure Exam taker, PDF and Scantron Format are selected
- Save the file to your desktop (this tells ExamSoft that you have a scantron file that needs to be uploaded.) At this point you don’t need to pdf file and it can be deleted.
- Select other options, as needed.
- Scroll down, and select Print/Export.
Import the Answers
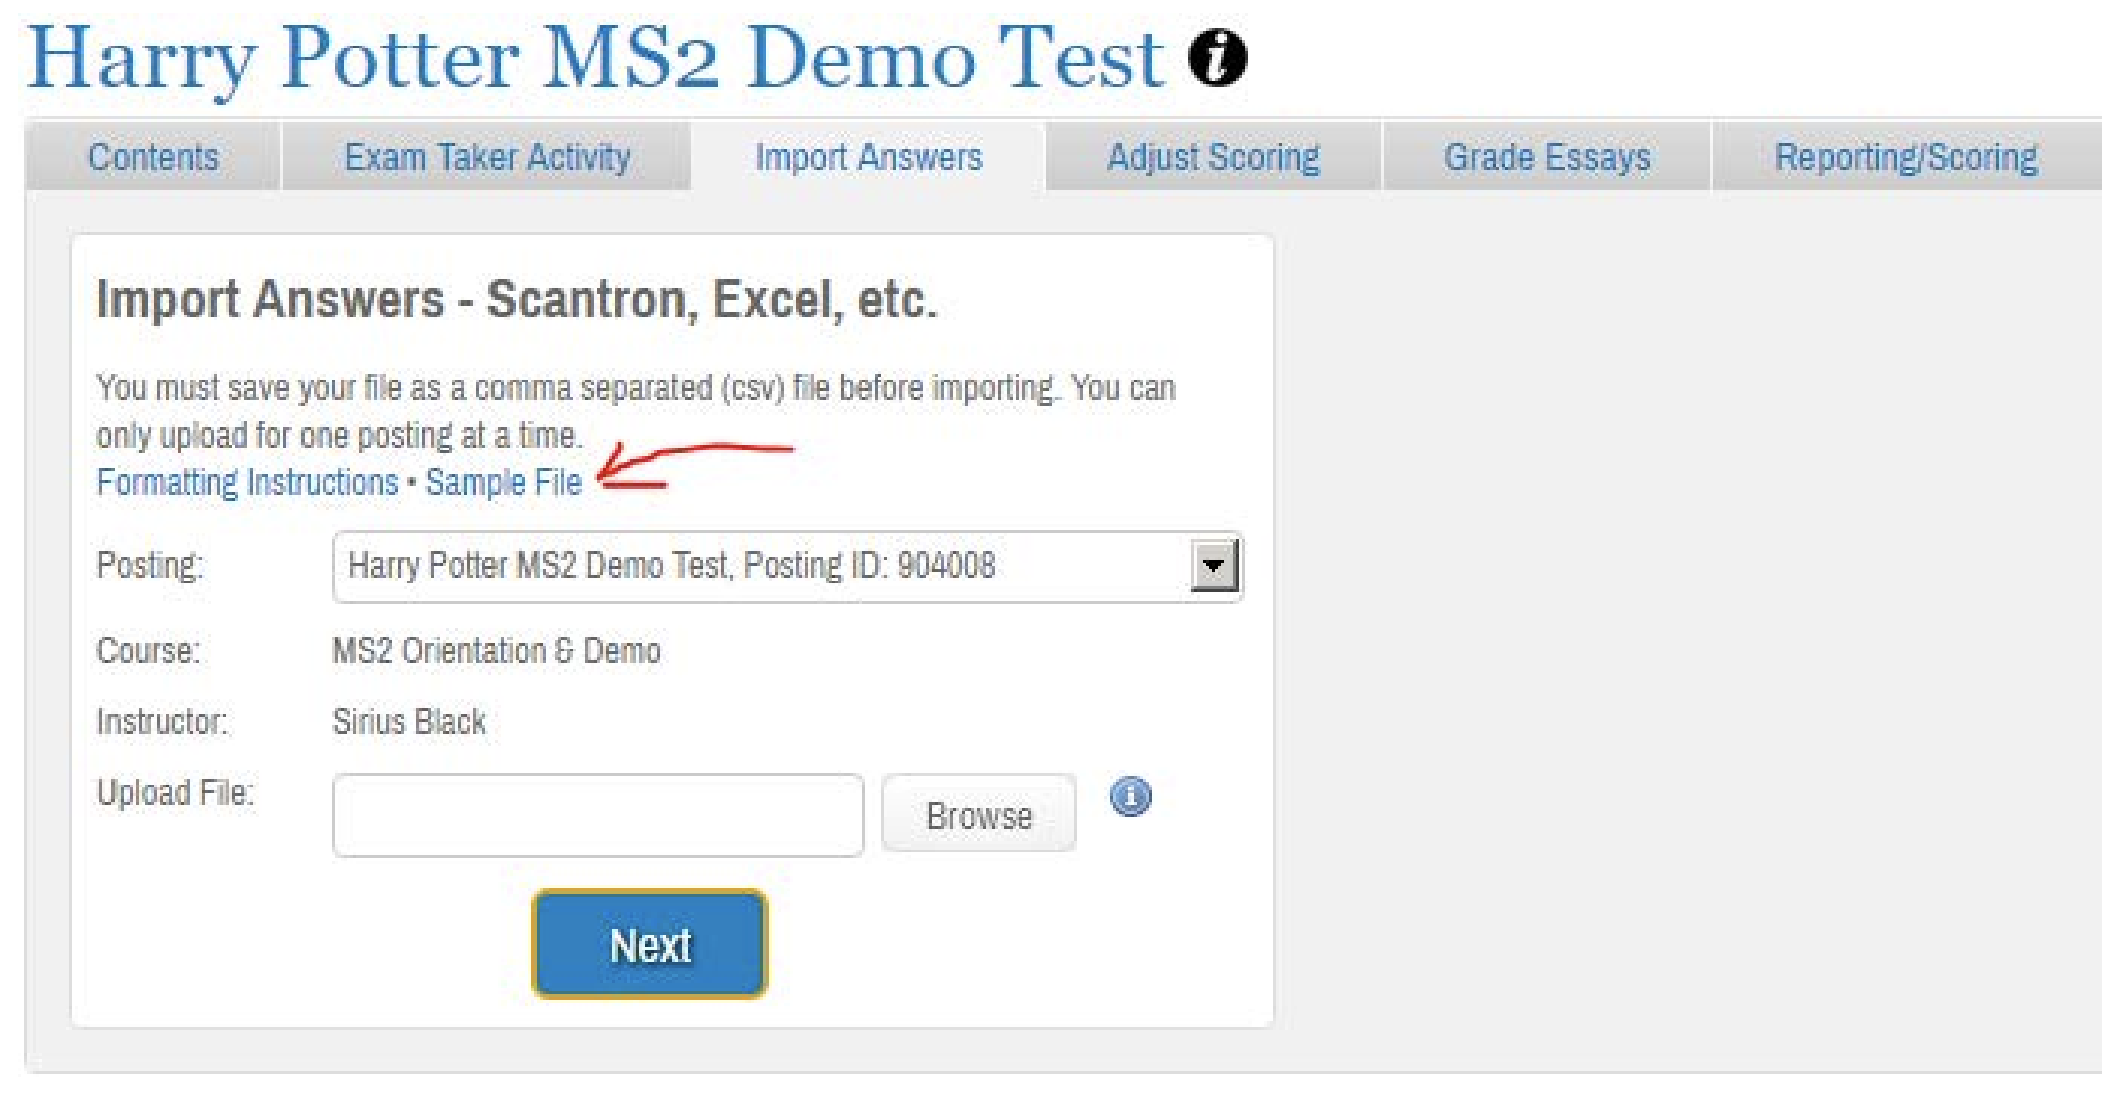
- Click on Import Answers [view screenshot]
- Make sure that data is organized in the following column order and that there are no column headers:
- Column A: BCM ECA (can be alpha-numeric)
- Column B: Test Form Version (A)
- Column C: Empty Column (blank)
- Column D, E, and so on: Exam-Taker Response to Question 1, 2, and so on
- Save as CSV file.
- Select the same posting that you selected before.
- Select Import Answers.
- Note: When importing FITB answers, up to 25 characters can be imported. The ONLY special characters allowed include: period, $, %, <, < , -, +, space.
- Upload the answer file, and select Next.
- At the Import Validation screen, select Continue.
- Select the Exam-Takers to import, and then select Import Selected Rows.
- Note: Any errors appear in red. An import confirmation screen will appear.
Note: Only True/False, Multiple Choice, Multiple Selection, and/or Fill in the Blank (FITB) questions can be imported. If using a bubble sheet with more than one section for FITB questions or a bubble sheet that does not have an option to bubble in multiple versions, you should not generate multiple versions of the exam.
For more information about Importing Exam Scores, go to Prepare and Import Data from Scantron Forms.
Some devices require an amount of time to reconnect to wireless internet after an exam. If the exam upload fails, it usually means your device has yet to reconnect to the internet. Resolve this by checking the wireless settings and ensuring you are connected to 'BCM Wifi', then re-upload the exam. If student is taking the exam away from campus, then the student needs to make sure they are connected to a reliable internet provider.
To prevent this error from occurring, you can adjust your Examplify preferences as described in this link: Resolving repeated "No Internet Connection" message.
Device & System Issues
iPads are not compatible with ExamID or ExamMonitor; nor are they compatible with non-secure, internet-blocked exams. If you are delivering the latter, the student will need to use a different device OR you can create a duplicate linked exam for that particular student and make it a non-secure exam.
Examplify software update issues typically revolve around forced update lockouts, installation freezing, Relaunch button failures, and Minimum System Requirement (MSR) rejections.
Reviewing these specific update problems and how to resolve them can help get your application running smoothly:
Common Update Issues & Resolutions
- Forced Update Lockouts: When a mandatory update is required, you will see a Software Update Required screen. You cannot use the application to take an exam until the update completes.
- Relaunch Failures: If you click "Relaunch" to apply an update and the application does not restart, you will need to manually locate the installer. For macOS, navigate to Finder > Go > Go to Folder and type /Library/Application Support/Examplify/Downloaded Version to locate and run the .dmg installer.
- Minimum System Requirements (MSR): Before launching or downloading an exam, Examplify checks your device. If your computer does not meet these requirements (e.g., low disk space), you will be prompted to update your device before you can continue.
- Stuck/Frozen Installers: Sometimes, antivirus software or permission issues block the update service. You can resolve this by closing the application, right-clicking the shortcut, and choosing Run as Administrator (Windows).
Any anti-virus program can potentially perceive Examplify as a threat and prevent it form operating correctly. Some anti-virus programs must be turned off completely before using Examplify, others can be told to ignore Examplify. This article shows how to tell Windows Defender to ignore Examplify.
To fix the problem, follow the below steps:
- Open the Windows Defender Security Center by clicking the shield icon in the task bar or searching the start menu for Defender.
- Select Virus & threat protection > Virus & threat protection settings > Add or remove exclusions.
- Under Add an exclusion, select folder C:\Program Files (x86)\Examsoft and click OK.
- Go to the section in the settings for Controlled folder access and click Allow an app through Controlled folder access. Navigate to and select C:\Program Files (x86)\Examsoft\Examplify\Examplify.exe.
Note: Contact ExamSoft directly so they can help you resolve error messages, if you are still needing assistance. They are the most knowledgeable about the system and why may be receiving error messages.
ExamSoft contact information (https://help.examsoft.com/s/).
- There should be a “chat” option in the bottom right of the screen which might be the fastest way.
- Email Support@examsoft.com
- Phone in US & Canada: 866-429-8889, ext. 1; International: +1 954-429-8889, ext. 1. The help desk is typically open 24/7.
In urgent situations (when a student needs to begin a test), suggest the student use a backup device. If this isn’t possible, they should restart their computer and try again; if that fails, they should uninstall Examplify and reinstall. If all that fails, they will need to contact ExamSoft support at 866-429-8889, or check their device to ensure it is fully updated.
- Examplify: Uninstall on a Mac
- Examplify: Uninstall on Windows
How to download Examplify, install the software, and log in for the first time.
During an exam, Examplify imposes certain security settings. After the exam, if Examplify could not automatically restore the original settings on the student's Windows device, you might notice issues such as missing buttons, missing splash screens, replaced wallpaper, or an inability to reconnect to a network. In this situation, a restart of the device is the best first step. If the problem persists the student can run Examsoft's EsWinsr program to restore the settings to their initial state.