
Blackboard offers a variety of ways to organize content in your course site. Good course design allows students to easily locate the information they need. You may choose to organize by topics, sections or weeks. To contain each topic/section/week's materials you can use a Content Folder or a Learning Module.
- Learning Modules are key tools for organizing content like a digital textbook chapter, allowing instructors to group items (docs, quizzes, discussions) sequentially, with forced navigation arrows for a focused student experience, unlike simple folders. You create them by clicking the + icon in your course, choosing Create > Learning Module, adding content (files, links, activities) using the + icon inside the module, and can set a forced sequence or allow free flow, with options for images and progress tracking
- Content Folders are used as containers to organize course content (documents, links, tests) within your Course Content page, nested up to two levels deep, by clicking the plus sign > Create > Folder, naming it, and adding content inside by opening the folder and repeating the process. Use meaningful names, add descriptions, and manage visibility to improve student navigation and organization, leveraging emojis or Learning Modules for complex structures as needed.
A good basic unit for adding content is an Item. Items can be added to either a module or folder. An item can contain text, attached files, web links, images, and more. Descriptive text can be added as well.
Watch a video about Types of course content in Blackboard
For more information about Organization and Adding Content, select from the following:
Ultra Documents
- Using documents in Blackboard Ultra means creating combined content pages (Ultra Documents) with text, images, videos, and file attachments (Word, PDF, etc.) for a rich, integrated student experience, added by clicking the plus sign in Course Content, selecting Create > Document, then using the editor and adding blocks for various media or files, including drag-and-drop, cloud uploads, or converting files.
Content Folders
- Creating a folder will allow you to give the folder a name and descriptive text.
- A content folder will give you the ability to insert items "into" the folder, allowing you to further organize your course.
Learning Modules
- A learning module is similar to a content folder - you are able to give the learning module a name, add a thumbnail image, and descriptive text.
- Unlike the content folder, a learning module will give you and your students a table of contents that automatically lists the content you put within the module.
- You can enforce sequential viewing of the items in the learning module, so students will need to access the items in the order that you determine.
- Immersive Experience: Reduces distractions and extra clicks, keeping students focused on one lesson at a time.
- Structured Learning: Supports thematic learning or textbook-based pacing, guiding students through concepts sequentially.
- Visual Clarity: Helps students understand module scope and organization easily.
- Navigate: Go to your course and open the Course Content page.
- Add Item: Click the + (plus) icon where you want the document to appear in the content list.
- Select Create: From the menu that appears, select Create.
- Choose Document: In the panel that opens, select Document under Course Content Items.
- Name & Configure: Give your document a name and adjust settings like visibility (hidden/visible to students) or add goals via the gear icon, then click Save.
- Add Content Blocks:
- Click Add Content or the + sign within the document to add a content block.
- Content Block: Use the rich text editor for text, images, links, or media.
- File Upload/Cloud Upload: Upload files from your computer or cloud storage (OneDrive, Google Drive).
- Convert File: Convert PDFs, Word docs, or PowerPoints directly into the Ultra Document format.
- HTML Block: Embed code for interactive content.
- Knowledge Check: Add quizzes or questions.
- Arrange & Save: Use the move/resize options on content blocks to design layouts; remember to Save your changes.
Key Features & Tips
- Flexible Layouts: Drag and drop blocks to create varied layouts with columns and rows.
- AI Design Assistant: Use this tool within a Document to generate attractive layouts with images and knowledge checks.
- Preview: Students see the content as you've arranged it, without editing tools.
- Navigate to Course Content: Go to your course and open the "Course Content" area.
- Initiate Creation: Hover your mouse over a line where you want the folder; a purple line with a plus sign (+) will appear.
- Select 'Create': Click the plus sign, then choose "Create" from the menu that pops up.
- Choose 'Folder': In the side panel (Create Item panel), select "Folder".
- Name the Folder: Enter a name and an optional description for your folder.
- Set Visibility: By default, folders are hidden from students; you can change this to "Visible to students" or set release conditions.
- Save: Click the "Save" button to create the folder.
After Creating the Folder:
- Add Content: Click the folder's title to open it and use the plus sign (+) to add files, links, assignments, or other items inside.
- Organize: You can drag and drop content into the folder or move the folder itself to different locations in your course
- Navigate to Course Content: Open your Ultra course and go to the main Course Content page.
- Start Creation: Click the + (plus) icon where you want the module to appear.
- Select Item Type: In the panel that appears, choose Create, then select Learning Module from the list.
- Configure Settings:
- Name: Give it a clear, relevant title (e.g., "Week 1: Introduction").
- Visibility: Set to "Visible to students" or hide it until ready.
- Description: Add text explaining what students will learn or do.
- Forced Sequence: Check this box to make students view content in a specific order.
- Image: Add a thumbnail image for visual appeal and context.
- Save: Click Save to create the module container.
- Add Content:
- Click on the new Learning Module to open it.
- Use the + icon inside the module to add items like documents, assignments, tests, folders, links, and discussions.
- You can drag and drop existing content or create new content directly within the module.
Key Benefits
- Organized Learning: Presents content logically, reducing clutter and extra clicks for students.
- Progress Tracking: Shows students what they've completed (checkmarks, in-progress icons).
- Engaging Experience: Images and focused content make navigation more intuitive and immersive.
Delete a Single Module/Folder
- Navigate to your course and the Course Content page.
- Locate the module you want to delete.
- Click the three dots (ellipsis) menu that appears on the right side of the module's title when you hover over it.
- Select Delete from the context menu.
- Confirm the deletion in the pop-up; this action permanently removes the module and all its contents.
Delete Multiple Modules (Batch Edit)
- On the Course Content page, click the three dots (ellipsis) next to "Course Content" at the top of the page.
- Select Batch Edit from the menu.
- Check the boxes next to the modules (and individual items within them) you want to delete.
- Click the Delete button that appears at the bottom right of the screen.
- Confirm the deletion.
Important Note: Deleting a module in Blackboard Ultra removes it and all its content from the course, and this action generally cannot be undone, so use caution.
Steps to Add an iFrame to a Blackboard Ultra Document:
- Create a New Ultra Document: Navigate to your course content, click the plus sign (+), Click on Create, and select Document to create a new item.
- Open the Editor: Give your document a name, then click the "Add Content" button or click into the text editor area to reveal the toolbar.
- Access HTML View: In the toolbar, find and click the HTML button (often < > or </>) to switch to the source code editor.
- Paste Your iFrame Code: Paste the iframe code (e.g., <iframe src="https://your-website.com" width="100%" height="500px"></iframe>) into the HTML window.
- Update & Save: Click the Update button (or similar) in the HTML editor pop-up, then click Save at the top right of the document.
Key Things to Remember:
- HTTPS Only: Blackboard typically requires that the src URL in your iframe code uses https:// for security.
- Security Restrictions: Be aware that complex or script-heavy embeds might be blocked by Blackboard's security settings; institutions can configure this, notes Blackboard Help (SaaS).
Method 1: Create a weblink in a Blackboard course
- Create a New Ultra Document: Navigate to your course content, click the plus sign (+), Click on Create, and select Link to create a new item.
- Add a Display Name
- Add the Link URL
- Add a Description (optional) (Maximum 750 characters)
- Save: Click the Save button
Method 2: Hyperlinking text within an existing Item/Page
- Go to Course Content: Navigate to the content area where you want to add the link.
- Edit or Create: Click the plus sign (+) and choose Create an Item, or edit an existing item.
- Type & Highlight: In the text editor, type your desired link text (e.g., "Visit the TMC Library") and highlight it.
- Click Link Icon: Click the chain link icon (Hyperlink) in the toolbar.
- Paste URL: Paste the website's address in the "Link Path" or URL box.
- Set Target: In the "Target" dropdown, select New window.
- Insert: Click Insert (or Save) to add the link.
Method 3: Adding a standalone "Link" content item
- Add Content: In your Course Content, click the plus sign (+) where you want the link.
- Select Link: Choose Link from the menu.
- Enter Details: In the panel, type a Display Name and paste the URL.
- Preview (Optional): Click the globe icon to preview the site.
- Save: Select Save. You can then adjust visibility (Show/Hide) for students.
Key Tips
- New Window: Always set the link target to "New Window" so students stay in your course.
- Standalone vs. Inline: Use Method 1 for text within an assignment/document, and Method 2 for a direct link to a resource alongside other files.
The “item” is an area where many types of content may be displayed, such as text, images, and videos. To add a text item, click the “Build Content” button and choose “Item.”
To add images in Blackboard Ultra, use the content editor's Insert Content (+) icon to upload from your device, add from a URL, use stock images, or generate with AI; you can also drag-and-drop images directly into the text area for inline embedding, ensuring you provide descriptive alt text for accessibility'. For assignments or discussions, use the paperclip icon in the submission box to attach files, while for course content, use the plus (+) sign to create new items.
For Inline Images in Content (Discussions, Documents, etc.)
- Open the Editor: Navigate to your content (e.g., a document, discussion board) and click into the text editor where you want the image.
- Use the Insert Content Icon (+): Click the plus sign icon in the editor toolbar.
- Choose a Source:
- Upload from Device: Select "Image" or "Attachment" to browse and upload from your computer (supports JPG, PNG, GIF, etc.).
- From URL: Paste a link to an image already online.
- Stock/AI: Use Unsplash stock photos or the AI Design Assistant if available.
- Add Alt Text: After adding, click the image to resize or edit, and always add descriptive alternative text for accessibility (screen readers).
- Drag & Drop (for embedding): Drag an image file from your computer directly into the text area (not the separate attachments box) to embed it with text.
One type of web-based learning content you can use in your course is called an SCO, or Shareable Content Object. These SCOs are gathered together into a compressed ZIP file called a content package. The zipped file can be unpackaged and played through a content player. Typically, individual components or entire packages are provided to you by schools, publishers, commercial companies, or other sources.
Add a SCORM Package
- Add a SCORM package to your course the same as any other piece of content.
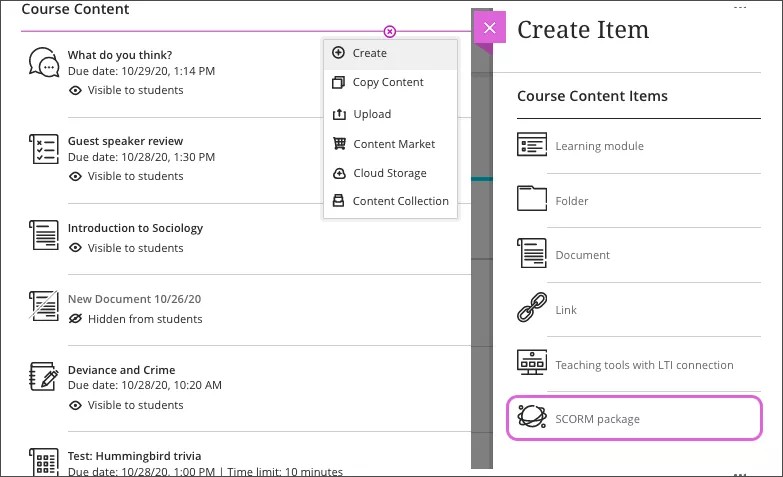
- On the Course Content page, select the plus to add content.
- In the menu, select Create to open the Create Item panel. Select SCORM package.
- In the SCORM Settings panel, select Upload SCORM package or Browse Content Collection.
- Locate and select the SCORM package to upload.
- After the file has been uploaded and checked, the SCORM Settings panel appears where you can set the content package details. [View Screenshot]
Watch a video about Add SCORM Packages to Blackboard
For more information about SCORM settings and SCORM Packages, go to the Blackboard Support Page