Course Availability
A course must be made available before the enrolled students will be able to access the course and its content. An instructor may want to make a course unavailable during the building process or after a scheduled class has finished. Students see all courses they are enrolled in, in their Courses list, whether those Blackboard courses are available or not.
If your Blackboard course is unavailable, access is determined by course role. Blackboard administrators, instructors, course builders, teaching assistants, and graders can see and access unavailable courses from the Courses list, even though they are marked as unavailable. Users with the Student role cannot access unavailable courses. Unavailable courses do not appear in the course catalog.
Email sent via the Blackboard course will be delivered to enrolled students even if that course is unavailable.
Course Settings allows you to customize your course to suit your needs and those of your students. Course Settings appears at the top right corner of an Ultra course if the user has privileges to view or manage settings.
You can manage course access state settings through the Course Settings page.
- Close Course. When you select a course as closed, it continues to appear in the course listing, but students cannot access it. When Close Course is not selected, the course is open, and students can access it. This function previously was called Open/Private and found in the Details & Actions panel.
- Complete Course. When the course is completed, students can access the content but cannot participate. Additionally, you can no longer make any changes once a course is completed.
At the top of your course, next to Course Settings, an indicator displays Open, Closed, or Complete based on the course state. Your students also see this indicator at the top of the course.
Additionally, instructors can access Course Settings from the Courses page. From the three dot menu, the instructor can select Course Settings.
Course Duration defines the time in which students may interact with a course. Students are always allowed to access some courses. Other courses have restrictions so students can only access them for a specific time. This is determined by Course Duration settings.
In addition to system administrators, you (or any user with the correct privileges, such as teaching assistants), can modify the course duration settings for your Ultra courses.
Select Course Settings at the top right corner of your Ultra course. The Course Duration settings appear as a drop-down menu that contains these settings:
- Ongoing. No restriction to access.
- Restrict by dates. Set dates and times for student access to begin, end, or both.
- Restrict by number of days from enrollment. Select the number of days after enrollment in which a student is no longer able to access a course.
- Restricted by the start and end dates of the associated term. This option only appears when a term is defined for the course.
Students can't access closed courses regardless of the course duration. Closed courses don't appear in the Course Catalog.
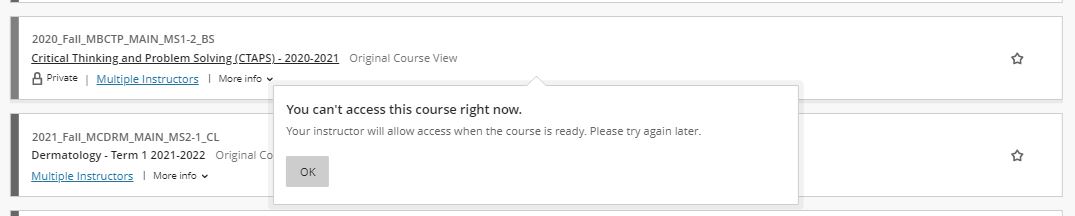
If students try to access the course in Blackboard before the set start date, the title of the course will be grayed out and will be followed by a message indicating when the course will be available. [View screenshot]
Use course terms to define the beginning and end of a period of study. You can make courses available during a specific course term.
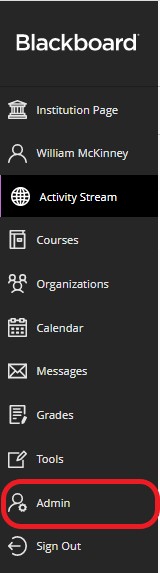
- From the left navigation, chose Admin (must have access to view this tab) . [view screenshot]
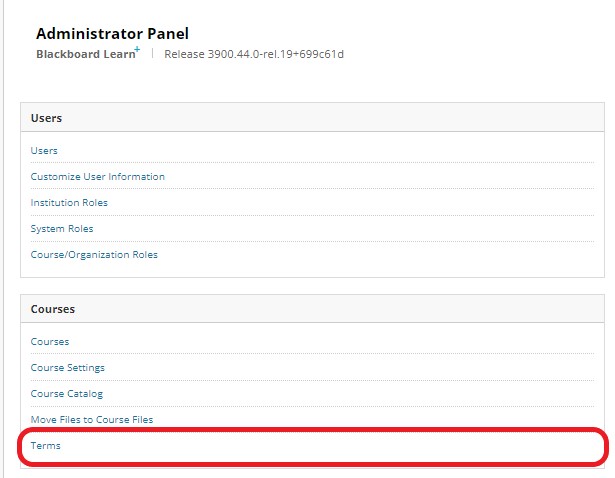
- On the Administrator Panel, in the Courses section, select Terms. [view screenshot]
- To create a new term, select Create Term.
- -OR-
- To edit an existing term, open the term's menu and select Edit. [view screenshot]
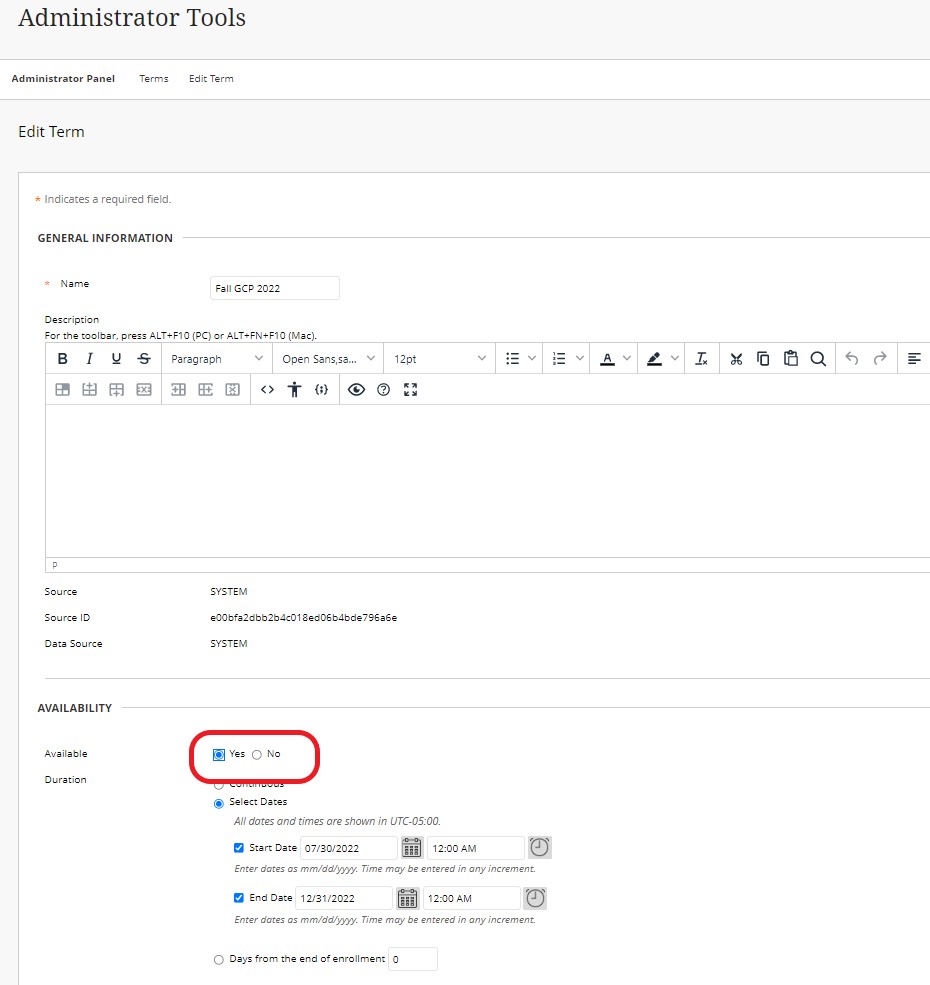
- On the Edit Term page, type a Name and optional Description.
- For Availability, select Yes to make the term available to courses throughout Blackboard Learn. Select No to make the term unavailable. [view screenshot]
- Set the Duration for the term.
- Continuous: Create a term with no beginning or end.
- Select Dates: Set calendar dates for the beginning and end of the term. The Start Date must be earlier than the End Date. Courses become available on the morning of the start date (00:01). Courses become unavailable on of the evening of the end date (23:59).
- Days from the end of enrollment: Define a course term as beginning at the close of course enrollment and lasting a specified number of days.
- Select Submit.
For complete information on Course Terms visit the Blackboard Help Center pages.
Copy and Move Course Content
Creating content for your courses takes time and thoughtful planning. If you teach multiple courses that use similar content, you may want to copy content items and folders between courses to save time. In the Ultra Course View, you can copy content from other courses you teach so you don't have to start with a blank slate.
You can copy entire courses or select individual items from other courses you’re currently teaching or have taught in the past. You can also combine items from multiple courses with a full course copy or individual item copies by selecting them.
Copying Specific Items
- Open Destination Course: Navigate to the Ultra course where you want the content to go.
- Initiate Copy: Click the plus sign (+) where you want content, or the three dots (...) menu above your content list.
- Select Copy Content: Choose Copy Content from the menu.
- Find Source: In the panel, find and select the course or organization you're copying from.
- Select Items: Check the boxes next to individual items or folders you want to copy.
- Confirm: Click the button to copy the selected content (e.g., "Copy Selected Content").
Copying an entire course
- Open Destination Course: Go to the empty Ultra course.
- Initiate Copy: Click the three dots (...) menu in the top right.
- Select Copy Items: Choose Copy Items (or Copy Content).
- Select Source Course: Find and select the checkbox next to the entire source course.
- Start Copy: Click Start Copy. The process runs in a queue, and you'll see a spinner.
Key Things to Know
- Ultra to Ultra: You generally copy content between two Ultra courses.
- Check for Errors: After copying, check the content for any issues or missing items, as some legacy content might not transfer perfectly.
- Visibility: Visibility settings usually carry over.
For complete instructions on how to Copy Content visit the Blackboard Help Center pages. You can also watch a video on Copying Content.
First, export the test from the current course:
- In the new course, click the plus sign (+) where you want the content to be added or click the three dots (...) at the top right of the course content list
- Click Copy Content from the menu
- Identify the item(s) you want to copy (you can navigate to multiple courses and copy all of the items in a single operation)
Copy Content from an Original Course to an Ultra Course
If you are copying content from a course in Original Course View into a course in the Ultra Course View, follow the same procedure for copying content into an Ultra Course. You can copy a single item (like a Test or Assignment) or folders that contain multiple items. Blackboard will convert the content during the copy process if it is possible to do so.
Note that we do not recommend copying an entire course. While it is possible to do so, your folder structure may be compromised if you have more than 1 level of folder in your Original Course. The Ultra Course View only allows for 2 levels of folders, which includes the Content Areas on your course menu in the Original Course View. This also does not give you the opportunity to redesign your course structure and navigation to take advantage of the more modern interface in the Ultra Course View. Instead of using copying an entire course from the Original Course View, we recommend building a new structure in the Ultra Course View and copying select items that would be time consuming to rebuild, such as Tests.
If you want to enroll multiple users in a course, enroll them in groups based on their course roles. You can select one role per set of users. For example, if a course has one or more instructors, enroll them first. Then, move on to students.
Optionally, you can enroll all users with a role of Student and then edit individual users to change their course roles. For example, if you want to enroll 23 students, 1 instructor, and 1 teaching assistant, you can enroll all 25 users with the role of Student. Then, edit the two users to change their roles to Instructor and Teaching Assistant.
- On the Administrator Panel in the Courses section, select Courses.
- Search for a course.
- On the Courses page, open the course's menu.
- Select Enrollments.
- On the Enrollments page, select Enroll Users.
- On the Add Enrollments page, if you know the users' exact usernames, type them in the Username box separated by commas. If you don't know the usernames, select Browse to search for users. Select the check box for each user to enroll, then select Submit.
- In the Role menu, select a course role for this group of users, such as Instructor. The role selected applies to this course only. Your institution can create custom roles.
- Define the Enrollment Availability for this group of users. To enroll users but make the course unavailable to them, select No. To enroll users and make the course available to them immediately, select Yes.
- Select Submit.
Contact Ed-Tech to Batch Enroll users into the course
In order to batch enroll students into Blackboard, their accounts must be created first. Below is the format and information needed by Ed-Tech to get the accounts created and enroll them in the course. Put the information into an Excel file, along with the course id and course name, and submit a Batch Enroll Request Form.
- ECA (BCM username) Look up ECAs on the BCM Intouch People page
- Last Name
- First Name
- BCM Email
- Role
- (B) Course Builder
- (P) Instructor
- (S) Student or Residents
- (T) TA – for faculty in your department helping with the program (including department head). This allows them to view modules before making them available if they wish.
- (U) Guest
- Password: Leave Field Blank
- BCM ID
Your Excel file should look like the example below:
| ECA | LName | FName | BCM Email | Role | Password | BCM Id |
| 456793 | Kent | Clark | ckent@bcm.edu | s | 456793 | |
| srogers | Rogers | Steve | srogers@bcm.edu | s | 634538 | |
| u345677 | Stark | Tony | tony.stark@bcm.edu | s | 345677 |
View more information about Users and Groups.
- Click the Roster link in the Details & Actions panel to the left of the Course Content page
- Click the Enroll People icon in the upper right (a plus sign (+) in a circle)
- In the search box type a name or username to reveal a list of matches (using an A- or Z-ID is recommended for individuals with common names)
- Select one or more people
- Choose a role for each selected person
- Click the Save button
NOTE: Users listed as an Instructor in the course are able to enroll other uses for any role in the same course. Any users listed as a TA can enroll only students in a course.
Availability: You cannot enroll users who have been made Unavailable in the Blackboard course. Contact Ed-Tech at ed-tech@bcm.edu for assistance enrolling Unavailable users. Users who have been enrolled in your course, but made Unavailable by you, will not see your course in the Courses tab and do not have access to your course.
- Under Details & Actions, click Roster.
- In the roster page, click on the users name or the ellipses icon next to their name.
- In the Member Information page, click on the trash can icon next to the user's name.
- You will be prompted to confirm by a pop-up dialogue box in the top of the screen. Click Remove Member.
Note: Removing students from a course also deletes all their course data (tests, surveys, discussions, assignments, grades.).
Removing Manually Added Instructors:
If you would like to remove a manually added instructor from a course, contact the Ed-Tech at ed-tech@bcm.edu for assistance.
Date Management
- On the Course Content page, click the three dots (...) on the right, above the content list
- Click Batch Edit in the menu
- Select the check box next to the items you want to update
- At the bottom of the window next to Edit selection, click the Edit dates button
- Use the Edit Type drop down menu to choose to update dates based on the course start date, based on a number of days, or to change the dates for all of the selected items to a specific date and/or time.
- Change dates by number of days: Type a number in the Shift dates forward or Shift dates backward field. All dates for the selected content shift forward or backward based on the field and number you choose.
Example: My course content was reused from another section this semester. The source had due dates on Wednesdays, but this course will have due dates on Thursdays. Use the Shift dates forward option and enter "1" to shift dates forward by one day. - Change dates based on course start: Select the start date of the course the content came from and the start date of the current course. The tool automatically calculates the number of days between the two dates and adjusts all due dates using that number.
Example: My course content was reused from a previous semester, when the course's start date was Aug. 19, 2023. My new course's start date is Jan. 6, 2024. Dates on the selected items are moved forward 140 days. - Change to specific date and/or time: Select whether you are want to change the show on date/time, due date/time, or the hide after date/time and specify the appropriate dates and times.
Example: I want to change all of the due date times across all assessments in my course to consistently be 8 p.m. I select the checkboxes for all of the assessments on the Batch Edit page, then use this date option by selecting only the Due Time checkbox and entering 8 p.m. in that field. Note that this only changes dates where they previously existed; it does not add a new date.
- Change dates by number of days: Type a number in the Shift dates forward or Shift dates backward field. All dates for the selected content shift forward or backward based on the field and number you choose.
- A message appears that your content was updated successfully. Click View Details to confirm which content was updated
For complete information on Date Management visit the Blackboard Help Center pages.