Tests and Quizzes
Create online tests and quizzes using Blackboard’s Test tool. These tests can be used for evaluating learning (with grades) or to allow students to master concepts using self-assessment.
Watch a video on Creating Tests.
For more information about tests and quizzes, select from the following:
To create a short test or quiz, you can make it directly in Blackboard. If the test is longer, the Blackboard tool can be a time-consuming process. However, if you want to create a longer test, there are tools that can shorten the process considerably. Respondus Exam Creation Tool (Windows only) can help you get a longer test into Blackboard more easily, however, you must format your document in a particular way.
Students can’t see a test until you make it visible. You can create all your content ahead of time and choose what you want students to see based on your course schedule. You can also set availability conditions based on date, time, and performance on other items in the course Gradebook.
To Add an Exam
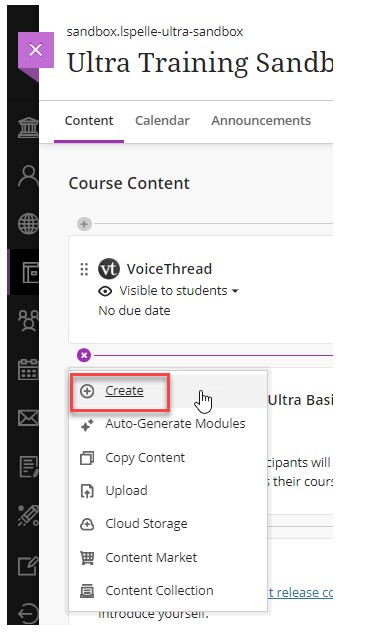
- Open your Blackboard Learn Ultra course.
- Browse to the content area where you want to add an exam.
- Click on the plus (+) sign.
- In the menu click Create. [view screenshot]
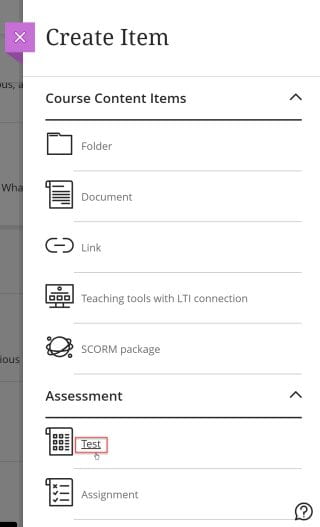
- In the Create Item panel, click Test. [view screenshot]
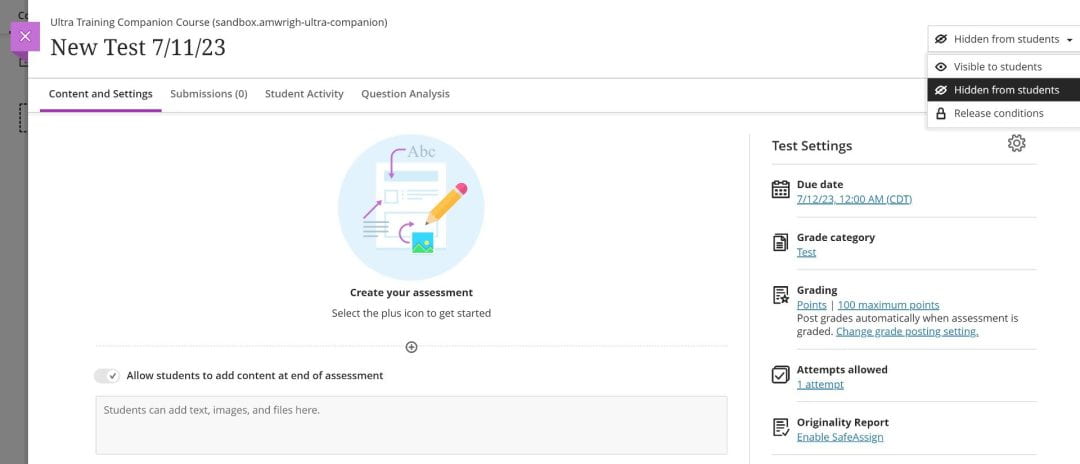
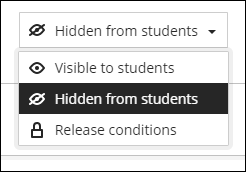
- This opens the New Test Page. On this page, you can add test content, control test visibility to students, and apply test settings. The left side is where you will add your test content and the right side is where you will adjust your test settings. The drop-down menu in the upper right is where you will choose to make the exam visible or set release conditions. [view screenshot]
For complete instructions on How to Create Tests, visit the Blackboard Help Center pages. You can also watch a video on Creating a Test.
Instructors can edit a test whether it has been deployed or not. Anything in the test can be edited before students take it. After any students have taken the test it is not possible to add questions, modify the number of questions in a question set or change a random block definition. If grades will be affected by the change, the instructor will see a message to that effect and will have the option to select Update and Regrade.
If the test is deployed:
- Navigate to the content area where students will see the test.
- Click the three dots (menu icon) next to the test's title..
- Choose Your Edit:
- Select Edit to modify the test's name, description, or instructions.
- Select Edit Test Options (or click the gear icon) to adjust settings like due dates, time limits, attempts, feedback, or availability.
- Select Edit the Test to go to the test canvas to change questions, points, or answers
For complete instructions on how to Manage Tests, visit the Blackboard Help Center pages.
This allows the instructor to take a test but does not record results in the Gradebook. (An alternative method is to use Student Preview mode to take the test. After taking the test when you exit Student Preview mode, select Keep the preview user and all data if you want to view the test grade in the Grade Center.)
- Navigate to the content area where the test is deployed.
- Look for the "Student Preview" button (often a person icon) in the upper-right corner of your course content page.
- Click the button and then select "Start Preview" from the options that appear.
- A grey bar will appear across the top of your screen, indicating you are in Student Preview mode
For complete instructions on the Student Preview mode visit Blackboard Help.
Blackboard has many options for how to customize assessments. To access settings for tests, assignments, and forms select Settings on the new assessment’s page. The Settings panel opens.
- Navigate to your test in the Course Content area in Blackboard Ultra.
- Select a category (e.g., "Details & Information") and check boxes or enter values for your desired settings.
- Click Save at the bottom of the panel to apply your changes.
For complete instructions on how to Manage Tests, visit the Blackboard Help Center pages.
You can set accommodations for individual students to exempt them from assessment due dates or time limits. Use accommodations to help students progress in the course even though they may have difficulty with some requirements.
You can also give an individual student an exception on a specific test or assignment to provide additional attempts or extended access, even if the assessment is hidden from other students.
Add student accommodations from the Roster, or the Gradebook student list view by clicking the three dot menu (...) next to the student's name. A panel will open where you can set a due date or time limit accommodation:
- Due date accommodation: Students with a due date accommodation may submit work any time after the due date for no penalty. Students with this accommodation will never have their work marked late.
- Time limit accommodation: Students with a time limit accommodation have a 'percentage of extra time' that will automatically apply to all assessments with a time limit. Note that you should set the extra time amount only, i.e. 50% for time-and-a-half, or 100% for double time. For example, if the exam has a time limit of 30 minutes, a student with an accommodation of 50% extra time (aka time-and-a-half) will have 45 minutes to complete the assessment. A student with an accommodation of 100% extra time (aka double time) will have 60 minutes to complete the assessment.
A student with an accommodation(s) set will appear with a purple banner icon next to their names in both the roster and gradebook.
Other instructors and TAs can see the accommodations flag in the course roster. Students cannot see accommodations you have assigned.
In the roster list view, students with accommodations appear with an icon next to their name and the type of accommodation is clearly visible in the accommodations column. You can view/edit a student's accommodation information by clicking on the type of accommodation link. [view screenshot]
![view screenshot]](https://cdn.bcm.edu/sites/default/files/untitled.jpg)
For complete instructions on How to Add Accommodations, visit the Blackboard Help Center pages. You can also watch a video on Granting Student Accommodations.
In order to increase test security, faculty can use Blackboard’s enhanced test results and feedback options under Test Options to:
- restrict when test results and feedback are shown to students immediately after test submission and later.
- select which results (scores, correct responses, and submitted answers) and question-specific feedback are shown.
By default, students see the test results for any course in the My Grades tool (always available in the My Blackboard menu of the global navigation panel) unless you disable the test results in Test Options or hide the grade column from students. Always think through the timing of what students see when they submit the test and later through the My Grades tool. By default, most courses also have a My Grades link on the course menu.
Note: By default, Score per Question is selected in the Show Test Results and Feedback to Students section; any selection in this area will show students the questions’ text.
Possible scenarios for showing test results and feedback:
- After Submission: Students can see their test results immediately after they have submitted their answers, if they still have access to the original test link, and in the My Grades tool.
- One-time View: Students can view test results once, only after clicking the Save and Submit Answers button. If a student later clicks on the test link in the content area or in the My Grades tool, they will only see the results the instructor has set. If the instructor has turned off all the results, the students will not see any. This works well for tests being delivered at different locations and times around the state.
- On Specific Date: Students can view test results only after the specified date and time fields.
- After Due Date: If the instructor gives the test a Due Date, students can view the test after that date.
- After Availability End Date: Students can view their results after the specified test availability end date.
- After Attempts Are Graded: If tests include essay questions that must be manually graded by the instructor, students will see the results after all the attempts have been graded. All students in the class must submit an attempt and the attempt must be graded for this option to work.
Faculty can set up to two rules to show results and feedback. If conflicts in rules occur, the most permissive settings for that user or group are granted. For example, students would receive the greatest number of attempts or longest availability.
Why do submission due dates and times change?
Learn Ultra accepts and marks late submissions received after the due date or time. However, an instructor can prohibit submissions after due date. Also, an instructor can prohibit new attempts after due date, even for assignments with multiple attempts.
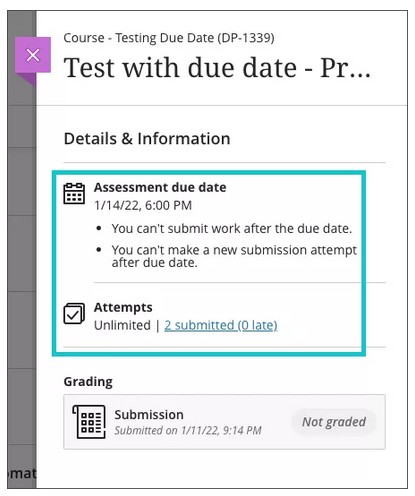
Identify changes in submission due date and time
Go to the assessment you want to check. Open the Details and Information panel on the assessment page and check the information below the title 'Assessment due date.' [view screenshot]
Prohibited submissions after due date
If you have due date restrictions, you will see a message saying that "you can't submit work after the due date." This means that you must complete your assessment before the due date and time, regardless of the number of attempts or time limit you have to submit your work. In-progress and saved attempts will auto-submit at the due date and you will receive a submission receipt via email. If you receive an accommodation and your instructor registered it for the course, the accommodation is honored.
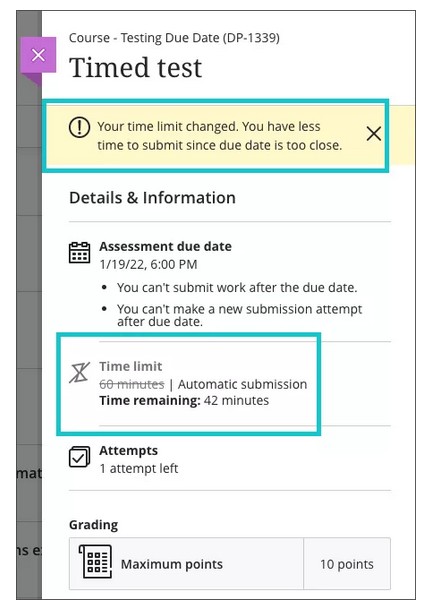
If you are starting an attempt too close to the due date, you will see a message in the Details and Information panel of your assessment that states your time limit has changed. Once you start the assessment, a timer with the new limit appears at the top of your assessment. [view screenshot]
Prohibited attempts after due date
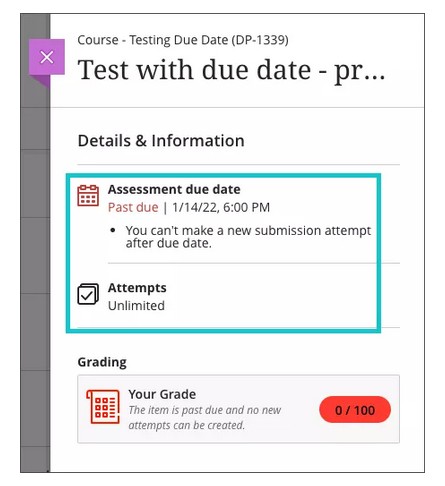
If you have new attempt restrictions, you will see a message saying that "you can't make a new submission attempt after due date." This means you are allowed to submit late, but you cannot start a new attempt regardless of the number of attempts you have remaining. Once you start the assessment, the time remaining to submit your work appears at the top of your assessment. [view screenshot]
For complete instructions on how to Prohibit late submissions, visit the Blackboard Help Center pages. You can also watch a video Prohibiting late submissions.
You can export and import tests, surveys, and pools to use in other courses or share with other instructors. Imported tests are available in the Tests section when you create a pool. You export tests, surveys, and pools as ZIP files that you or other instructors can import into other courses.
Export a test, survey, or pool
- Access the menu for a test, survey, or pool and select Export.
- Select OK in the pop-up window to save the file.
Two export options appear in the menu. To save the file to your computer, select Export to Local Computer. To save the file in the Content Collection, select Export to Content Collection.
Protected questions imported originally from a Course Cartridge won't be included in an export.
Import a test, survey, or pool
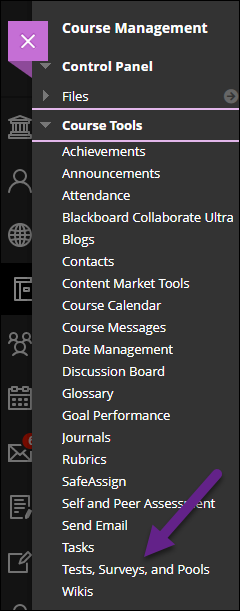
- On the Control Panel, expand the Course Tools section and select Tests, Surveys, and Pools.
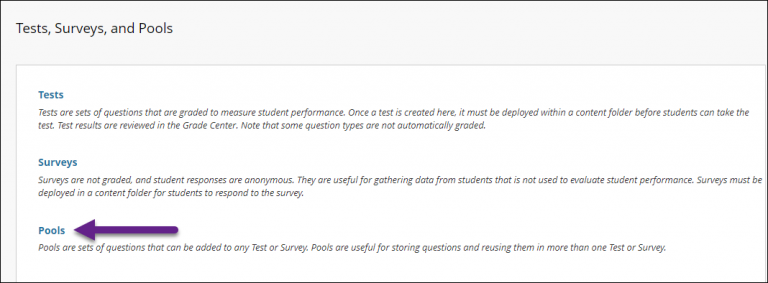
- On the Tests, Surveys, and Pools page, select the item you want to import, such as Pools.
- Select Import.
- On the Import page, browse for the file from your computer or your course's file repository: Course Files or the Content Collection.
- Select Submit.
Troubleshooting
You can import only test, survey, and pool ZIP files exported from Blackboard Learn.
If they're in the proper format, you can import tests and surveys created by others at other institutions or created in older versions of Blackboard Learn.
Video: How to Export and Import a Test or Survey explains how to export a test or survey from one course and import it into another course.
Pools
A question pool is a collection of questions that is stored for repeated use.
In the Ultra Course View, you can use pools to create tests and surveys. You can also export and import pools for use in tests in other courses.
- Questions in a pool are almost identical to test questions. They can contain feedback, metadata, and all the other elements of a test question, but they don't contain point values.
- Instructors typically use pools to create a database of questions they can reuse in multiple tests. For example, an instructor for a Sustainable Living course can create a question pool for each of the central topics taught: Diet, Housing, and Energy. The instructor can then use these pools in multiple tests and in other courses.
Watch a video about Using Pools in an Assessment
For more information about Pools, select from the following:
For complete instructions on how to Use Question Pools, visit the Blackboard Help Center pages. You can also watch a video on Using Question Pools.
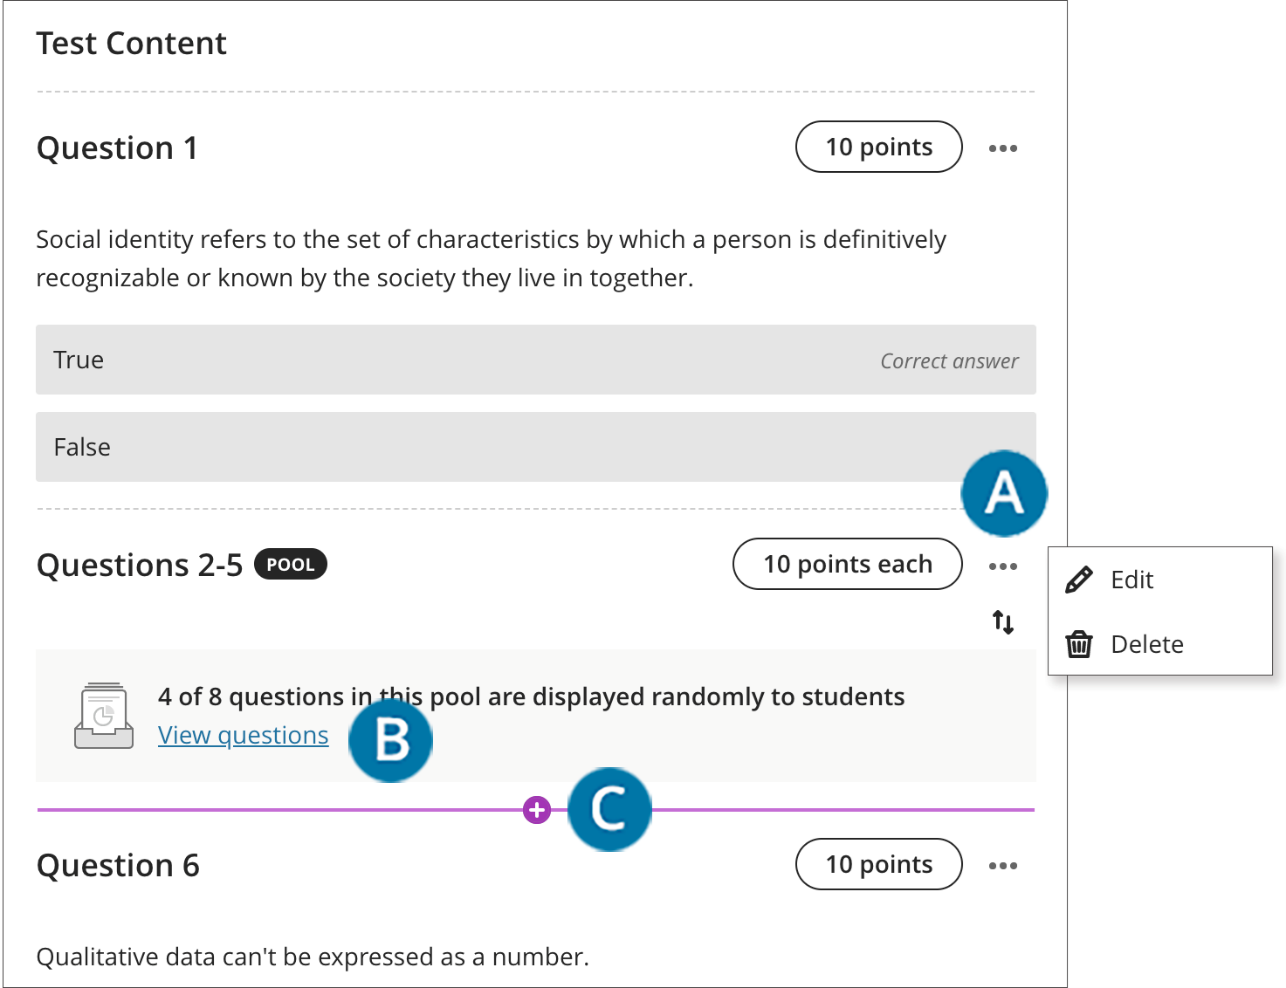
In Ultra Course View, Question Pools is the term used to describe a group of questions that are randomly assigned to students taking an assessment. They are similar to Question Sets or Random Blocks in Original Course View.
- Under Course Content, locate the Assessment you want to add a Question Pool to.
- Click on the Assessment. [view screenshot]
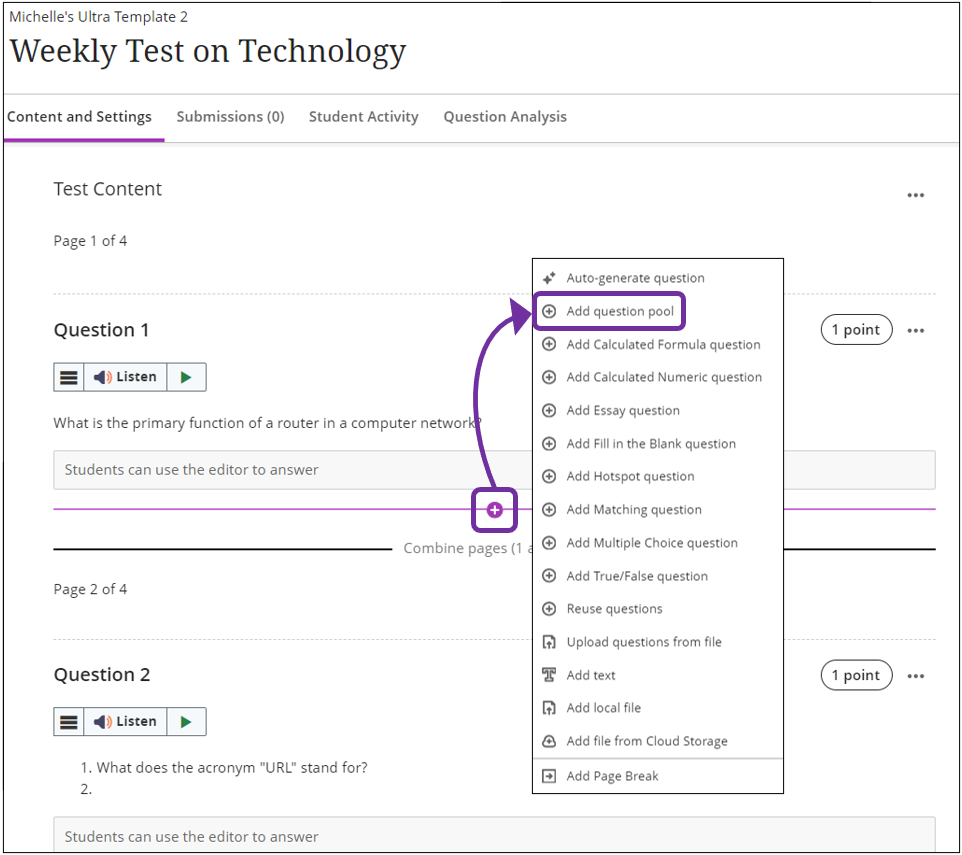
- On the Content and Settings Page for the test, hover over the dashed gray line. [view screenshot]
- It will turn purple, and a plus sign will appear in the center. [view screenshot]
- Click the plus sign, and a menu will appear which allows you to add questions to the Assessment. [view screenshot]
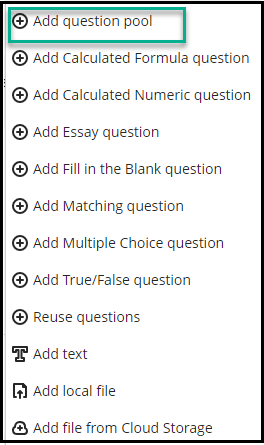
- Click Add Question Pool. [view screenshot]
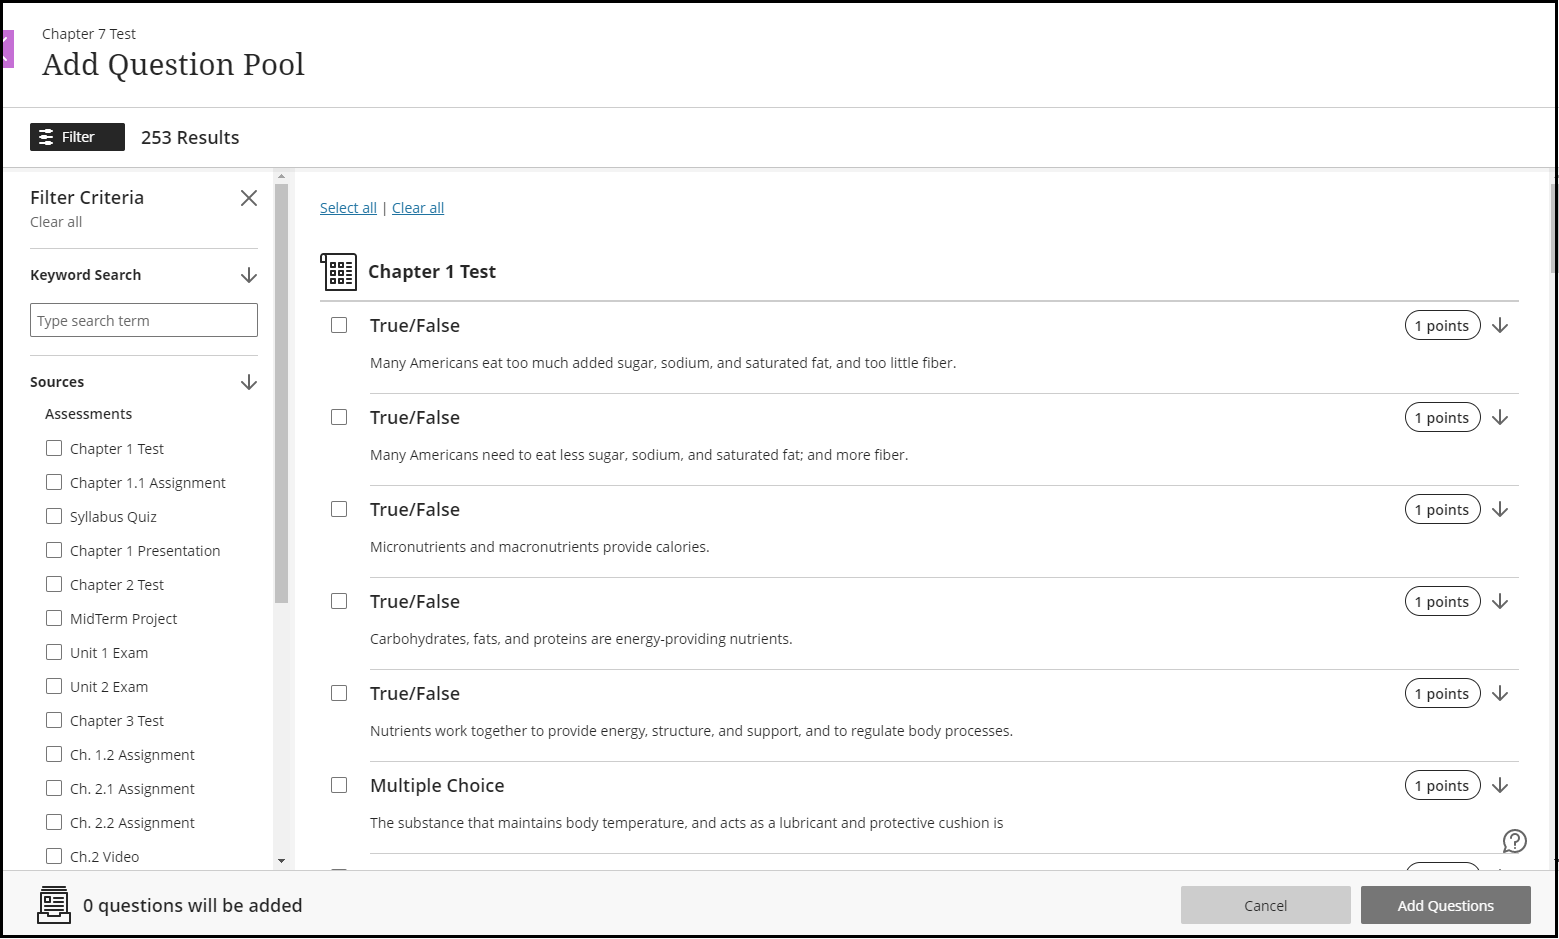
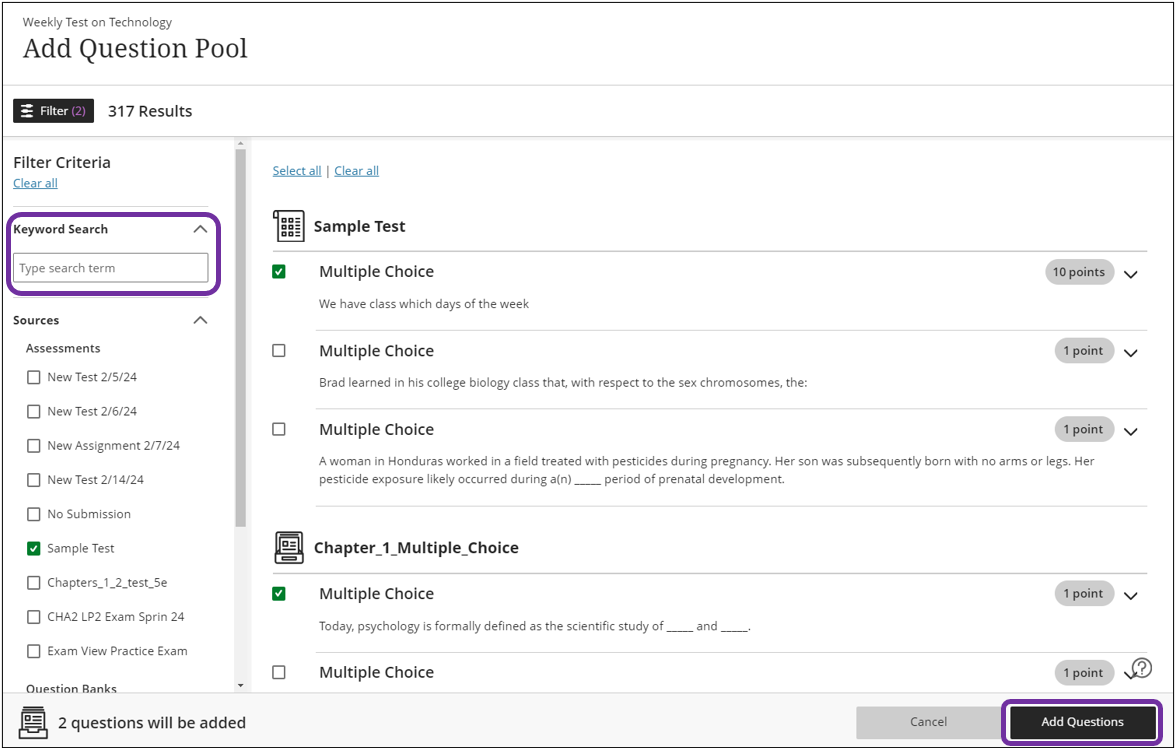
- A new window will appear containing all of the questions in the course. [view screenshot]
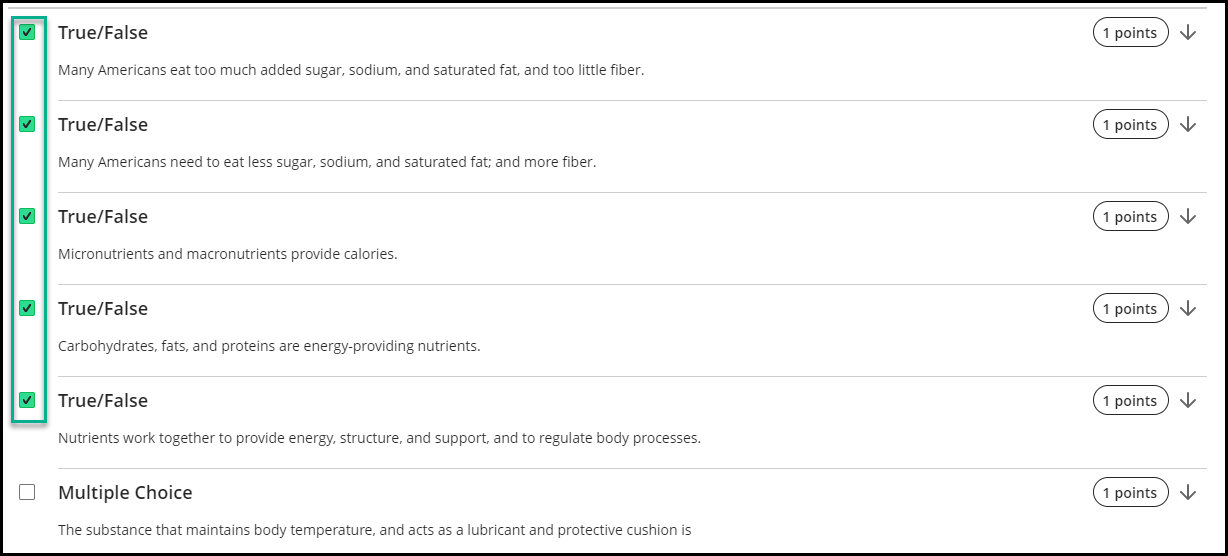
- Check the box next to each question you want to include. [view screenshot]
- Once you have selected all the questions, click Add Questions. [view screenshot]
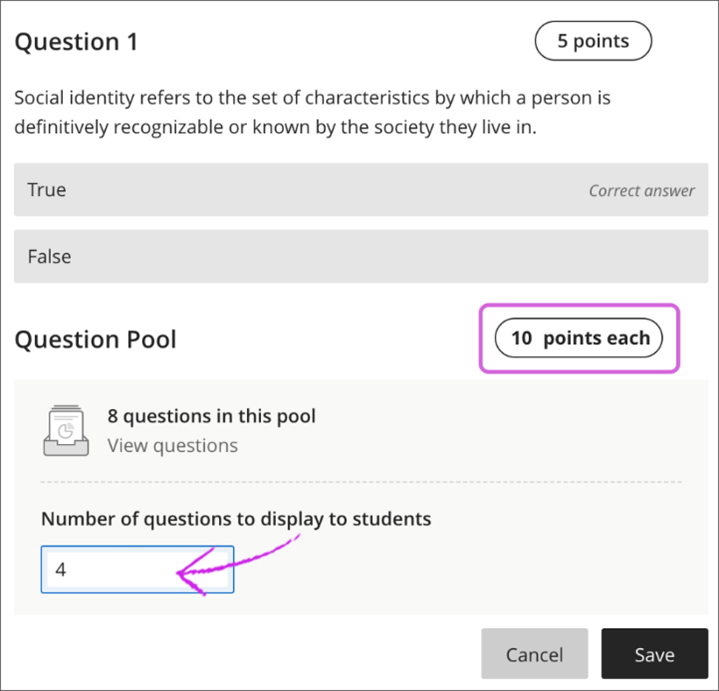
- Set the Question Pool Options. [view screenshot]
- Points each: Set the number of points each question in the pool is worth.
- Number of questions to display to students: Set the number of questions to show to each student.
- Click Save.
For complete instructions on how to Use Question Pools, visit the Blackboard Help Center pages. You can also watch a video on Using Question Pools.
What is a question pool in Blackboard?
When you create a test or an assignment, you can use question pools to be sure each student receives a different version of the assessment. On the Add Question Pool page, you can browse, preview, filter, and select questions from other assessments and question banks in the course you’re currently in. Learn more about question pools in the video below, or by following this link to Anthology’s help page dedicated to question pools here.
On the Add Question Pool page, you can browse, preview, filter, and select questions from other assessments and question banks in the course you're currently in. You can view the questions but can't make edits until you add the question pool to your assessment.
- You can use a keyword search to find questions to add.
- You choose the number of questions from a pool to display to students. For example, you can show 3 questions out of 50. The questions are then randomly distributed, so each student sees a different set of 3 questions.
- You can display all the questions in a pool. Questions appear in a random order for each student.
- After making your selections, you set the same points for all questions in the pool.
- You can delete questions in a pool. The question is removed from the pool but not deleted from your course.
- In the student view, questions randomly selected from a pool appear like other questions. Students won't know the questions are from a pool.
Please note that You can’t add a question pool if:
- You’ve added a rubric to your assessment.
- You’ve chosen to collect submissions offline.
- Your students have already opened the assessment.
Add a Question Pool
In an assessment, select the plus sign wherever you want to add a question pool.
Select Add question pool from the menu. [view screenshot]
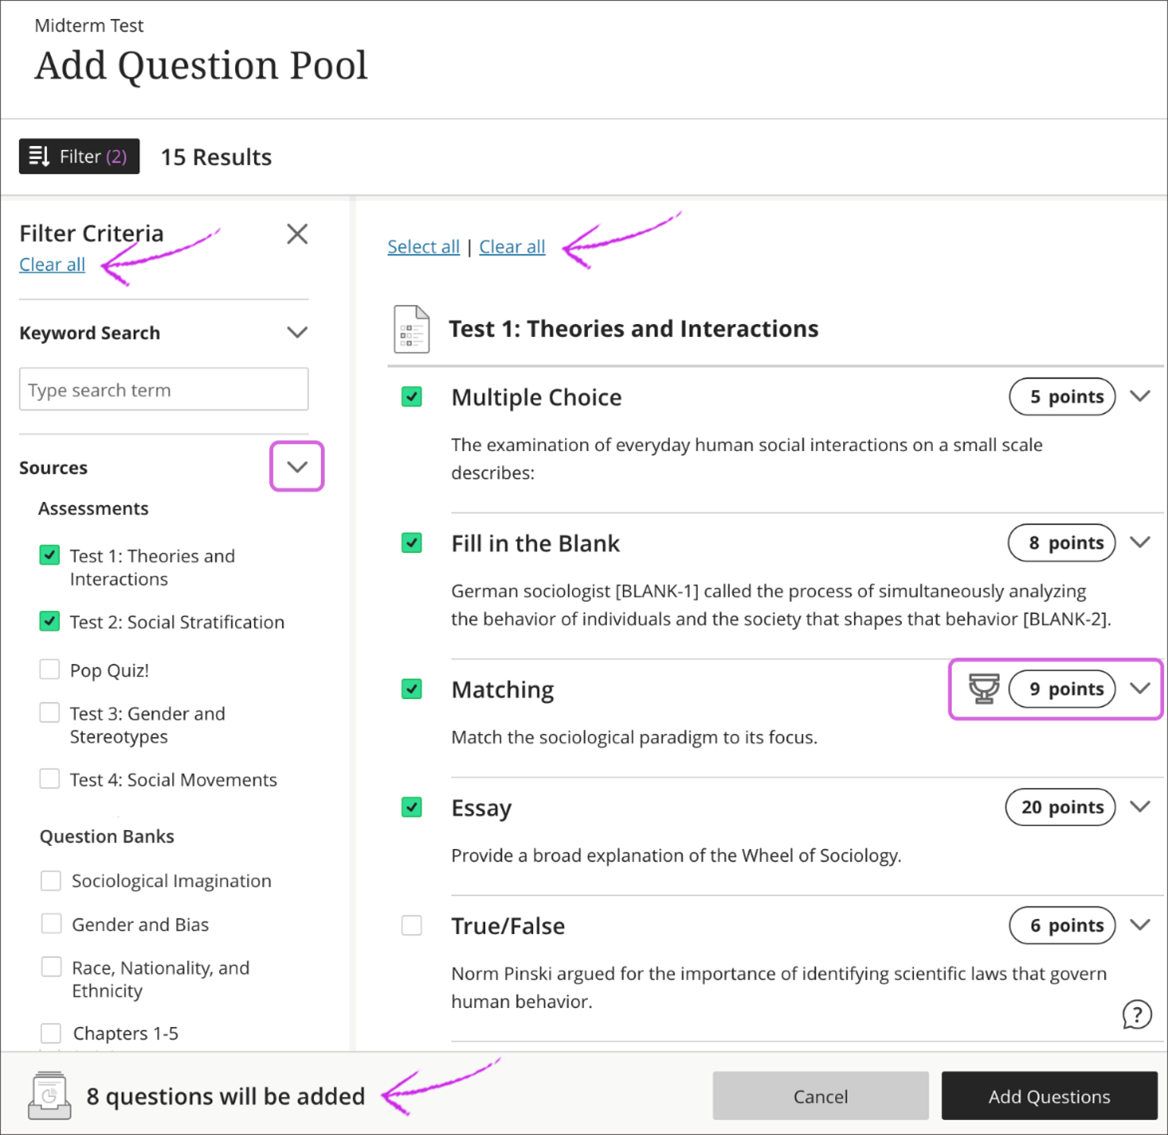
On the Add Question Pool page, select the assessments, question banks, and question types you want to include in your pool. In the Filter Criteria panel, you can also perform a basic search by keyword.
Filter questions
In the active filter area on the right, select the questions you want to add. You can view how many items you've selected at the bottom of the screen.
Select Clear all to clear the Filter Criteria selections. Any questions your have selected will remain selected.
To remove selected questions, use Select all and Clear all to remove all questions at one time. [view screenshot]
View Questions
On the Add Question Pool page, you can expand questions to view them. You can't edit the questions or the points on the Add Question Pool page. [view screenshot]
Once you have selected all the questions, click Add Questions. This is to insert the question pool into your assessment. [view screenshot]
Select Add Questions. The question pool appears in your assessment. Type the points and the number of questions to display to students. The points are assigned to each question in the pool. You can't assign separate points for individual questions in the same pool.
Select Save to add the question pool to your assessment. [view screenshot]
Edit Question Pools
You can edit the points assigned to each question in the pool even after submissions. [view screenshot]
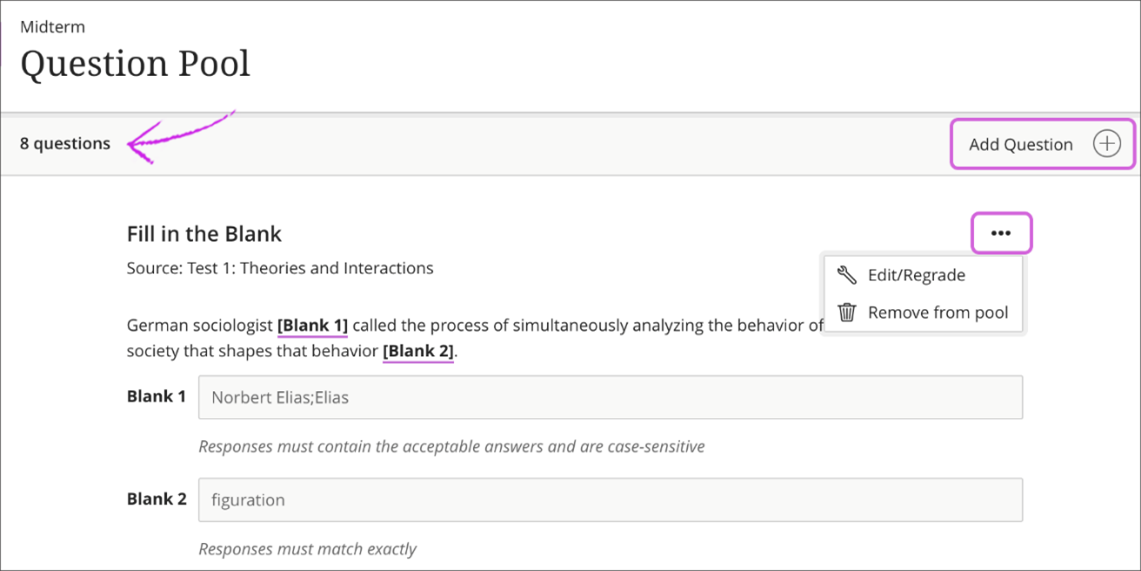
Before students open an assessment, you can add, remove, and edit individual questions in a question pool. When you remove a question in a pool, the question isn't deleted from your course. You can also delete a pool or move a pool to a new location in the assessment. [view screenshot]
- After you save the question pool, press the Drag to reorder icon in a pool's row to move it to a new location. The question numbering updates automatically. Open the menu and select Edit to make changes to the pool, such as the questions' points. Select Delete to remove the pool from the assessment.
- You can view the questions in a pool and add, remove, or edit questions.
- To view questions in the pool, select View questions. On the Question Pool page, the number of questions in the pool is listed in the top-left area. The source assessment for each question in the pool is listed.
- Select the plus sign wherever you want to add another question pool.
When you select Edit/Regrade, a notification states how many other assessments are affected. If you edit a question in a question pool, the edits appear everywhere the question is used. The same is true for edits you make in a source assessment's questions. Those edits affect all the question pools where the question appears. [view screenshot]
After students open an assessment or make submissions, you can't add or remove questions from a pool or delete a pool from an assessment. You also can't move the pool to a new location in the assessment. You can edit, regrade, and give full credit for questions when submissions exist. For example, if you change the correct answer, the question is regraded in all assessments where the question is used.
Give full credit option
You can give everyone full credit for a question you didn't explain clearly or doesn't accurately reflect your lecture or textbook material.
You can give full credit for a question from the View questions link in a pool or a student's submission page. If you apply full credit for a question in a source assessment or a question pool, full credit is applied to that question everywhere it appears.
After you select Edit/Regrade in a question's menu, you can select the check box for Give full credit for question. After you give full credit, you can clear the check box to revert to the automatic grade or a previously assigned manual grade. [view screenshot]
Your update affects existing attempts, attempts in progress, and subsequent submissions. Student grades are updated, but the new grades or reversal may not appear immediately.
You can't change student scores for an individual question when you give full credit. You can override each student's assessment score to adjust the points.
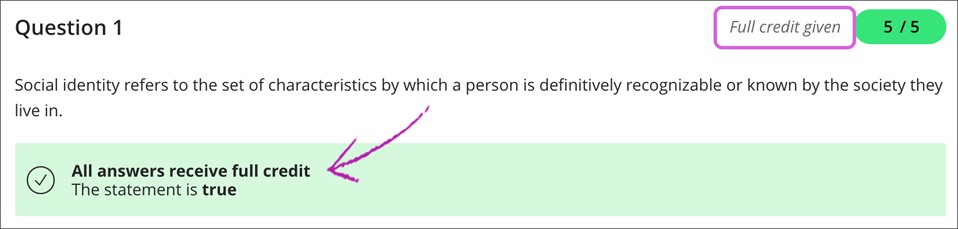
Student view of full credit
After grading is completed and you show students the correct answers, they can see which questions you've awarded full credit. Full credit given appears next to the grade pill and is also noted in the answers section. [view screenshot]
Note: After importing your question pool into Ultra, it is extremely important to do a quality check to ensure it is imported correctly. You may need to make some minor changes.
To export a question pool from Blackboard Original:
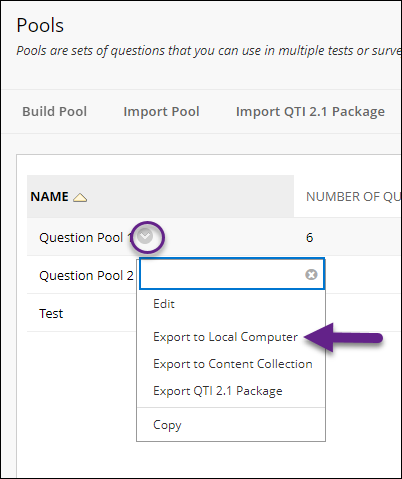
- In Blackboard, click the Courses tab. Then click on the Classic course from which you want to export the pool.
- In the left-hand Course Menu, under the Control Panel, select Course Tools > Tests, Surveys, and Pools. [view screenshot]
- On the Tests, Surveys, and Pools page, select Pools. [view screenshot]
- Locate the pool you want to export and select the Drop-down Arrow > Export to Local Computer. A zip file will automatically download to your computer. [view screenshot]
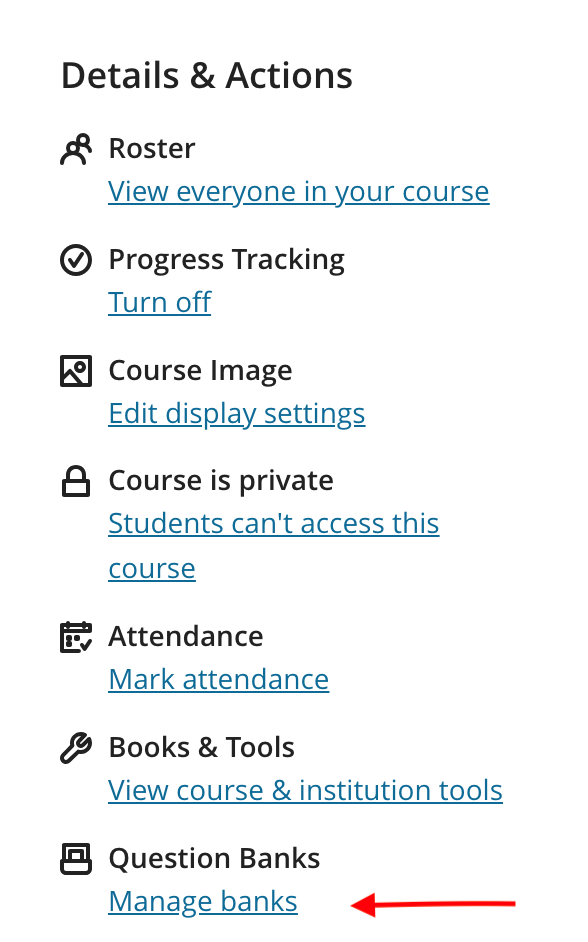
To import a question pool into Blackboard Ultra:
- Go back to the Courses page, and select the Ultra course you want to import the pool into.
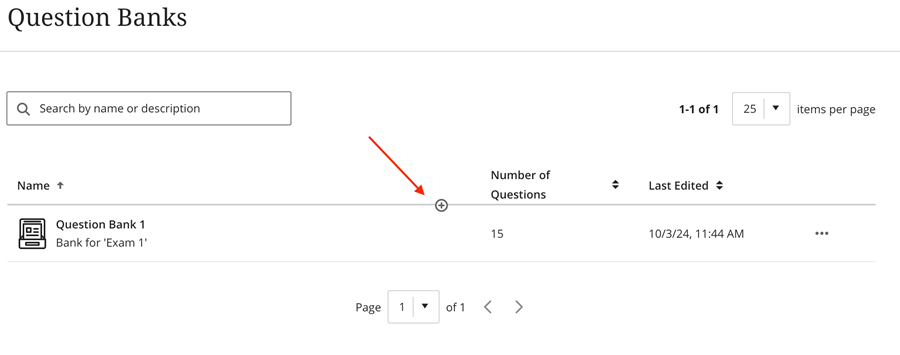
- In the Details & Actions panel, select Manage Banks. [view screenshot]
- The Question Banks page will open. In the middle of the screen, select the plus sign. [view screenshot]
- Select 'Import from file' to browse your device, locate the question pool zip file you previously downloaded, and select Open. [view screenshot]
- You’ll receive a success message when the file imports successfully. [view screenshot]
Assignments
Faculty members use Blackboard Assignments to manage the file upload of essays, papers or other documents submitted by students. Assignments allow students to type in a short answer or essay response and/or attach a document with their submission. Instructors can allow one or multiple attempts. Once student work is submitted, download the documents from the grade center one-by-one or as a “batch” per assignment. You can respond to each student separately with comments and attached files.
Like other assessment tools, you can provide instructions for your students and a point value for the assignment. Written assignments allow for the assessment of critical thinking, synthesis and other higher order skills.
For more information about Blackboard Assignments, select from the following:
Or, you can view step-by-step instructions for creating assignments in Blackboard below;
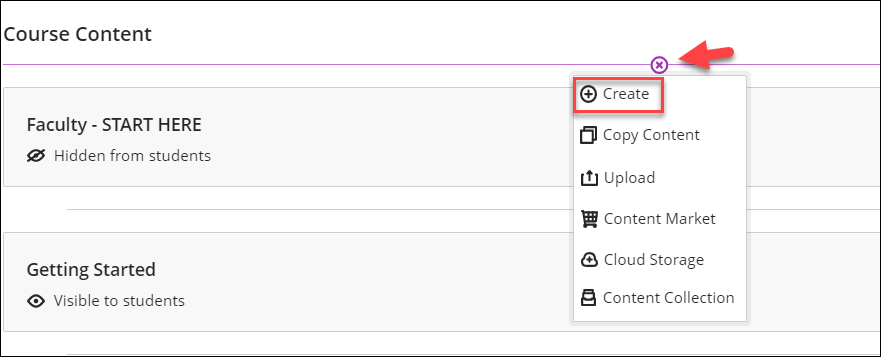
- Navigate to where you want to add an assignment, select the Plus sign, and from the drop down menu, select Create. The Create Item panel will open on the right. [view screenshot]
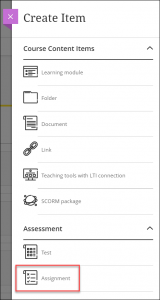
- On the Create Item panel, select Assignment. The New Assignment page will open. [view screenshot]
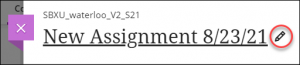
- On the New Assignment page, enter a meaningful title for your assignment. [view screenshot]
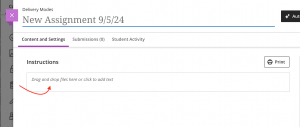
- To add instructions or upload a file, please click on the box that says ‘Drag and drop files here, or click to add text’. [view screenshot]
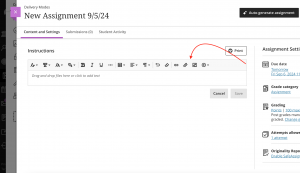
- You will then be able to add images, files, text, LTI’s, math equations and other kinds of online or cloud-stored media into your assignment. [view screenshot]
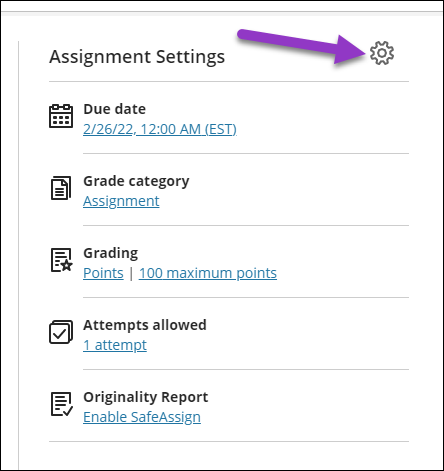
- To change the assignment settings, select the Settings icon (on the right). The Assignment Settings panel will open. [view screenshot]
- In the Assignment Settings panel, change the settings as you require. This Blackboard resource on assignment settings describes each option and what it does.
By default, all new items are hidden from students. To change the visibility so students can see the assignment, in the top right corner of the assignment, select the drop-down arrow and choose the desired option. You could also create release conditions for this content, which you can learn more about at the Innovative Learning’s Setting up Release Conditions page. [view screenshot]
For complete instructions on how to Create an Assignment, visit the Blackboard Help Center pages. You can also watch a video for the Assignments Overview for Instructors.
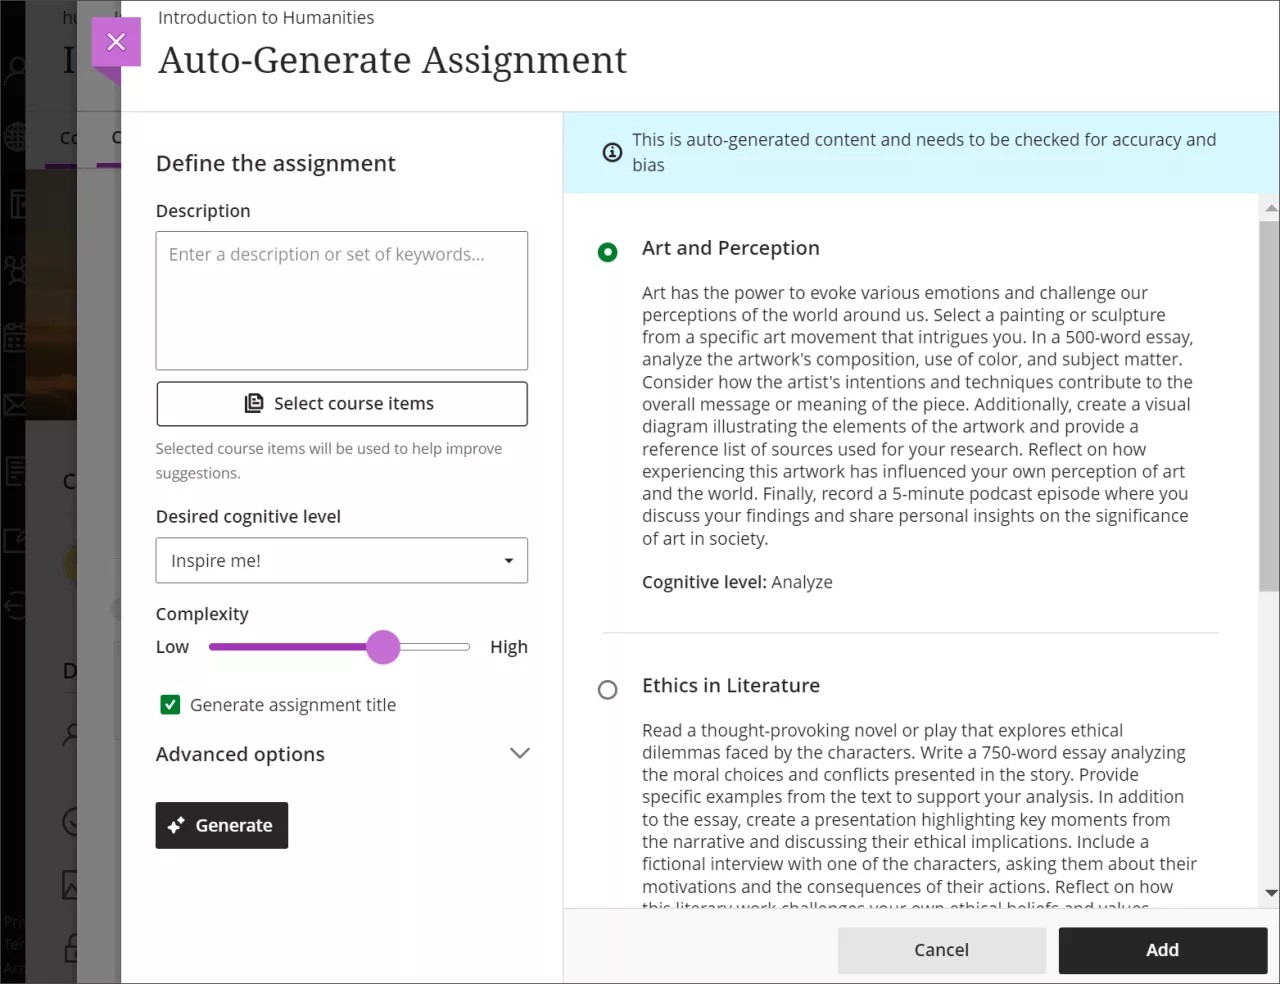
- On the assignment creation page, select Auto-generate assignment.
- The AI Design Assistant generates three assignment prompts. You have several ways to refine the prompts that the AI Design Assistant generates. [view screenshot]
- Enter a description (limited to 2000 characters) to narrow the focus of the prompts
- Select the desired cognitive level
- Apply
- Analyze
- Evaluate
- Create
- Inspire me! provides you with a mix of levels
- Adjust the complexity of the prompts’ focus
- Select whether or not you want to generate a title for the prompts
- Select Advanced options to change the output language
- Select the desired cognitive level
- Enter a description (limited to 2000 characters) to narrow the focus of the prompts
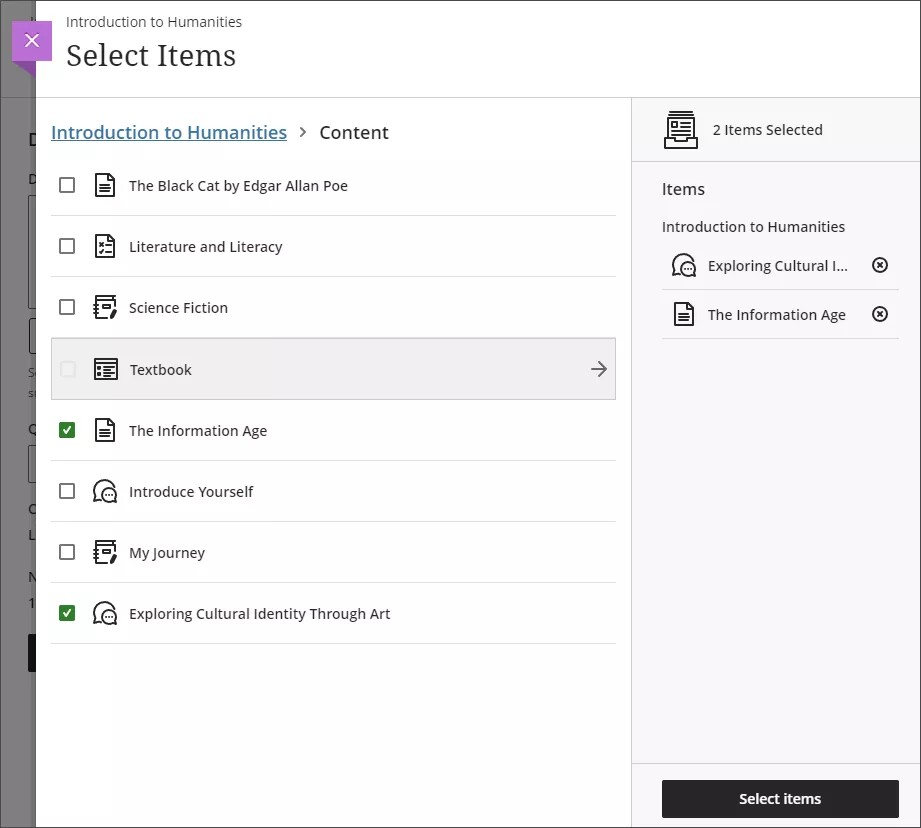
- Optionally, you can select which course items you’d like the AI Design Assistant to provide context for the assignment prompts. Select Select course items to start. [view screenshot]
- Once you’ve finalized your settings, select Generate. Review each prompt for accuracy and bias. Choose the prompt you’d like to add to your assignment, then select Add.
- Learn more about using the AI Design Assistant when creating Journals, Discussions, or Assignments by following the instructions and guidance at our “AI Design Assistant” article.
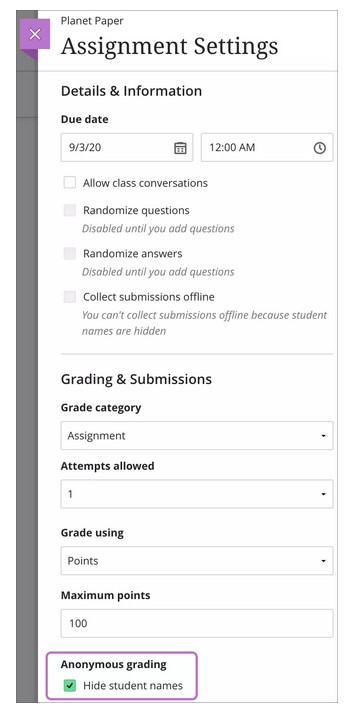
Enable anonymous grading
You can enable anonymous grading for assignments and tests that don't contain the built-in question types. You may add only text and files to anonymously graded assignments and tests.
Student names are hidden while you grade and are revealed only after you post all grades.
You can't hide or show student names after students open an assignment or test or submit attempts. [view screenshot]
When you hide names, you can't add questions, reuse questions, or select these settings:
- Allow class conversations
- Collect submissions offline
- Assign to groups
Enable parallel grading
You can have specific users in your courses grade sets of assignment submissions. Graders can't see other graders' grades, feedback, annotations on student files, and rubrics. They grade in parallel and provide provisional grades. The default grading roles include instructors, graders, and teaching assistants.
The instructor role is the default final grader or reconciler. The reconciler reviews the provisional grades and determines the final grades that students see. You can assign the ability to reconcile grades to one or more other users with grading privileges and remove your ability to reconcile.
More on parallel graders and reconcilers
You can enable parallel grading and assign graders when you create an assignment. You can also enable parallel grading even after students make submissions. The system randomly assigns graders you choose so each student has two graders for the assignment. The grading workload is distributed evenly among the graders. Graders can only open the submissions for the students assigned to them.
Students aren't notified that the assignment has more than one grader unless you inform them. Students see only the final grade and feedback the reconciler provides.
At this time, you can’t create groups or add questions when parallel grading is enabled. Graders, teaching assistants, and course builders can't enable or disable parallel grading.
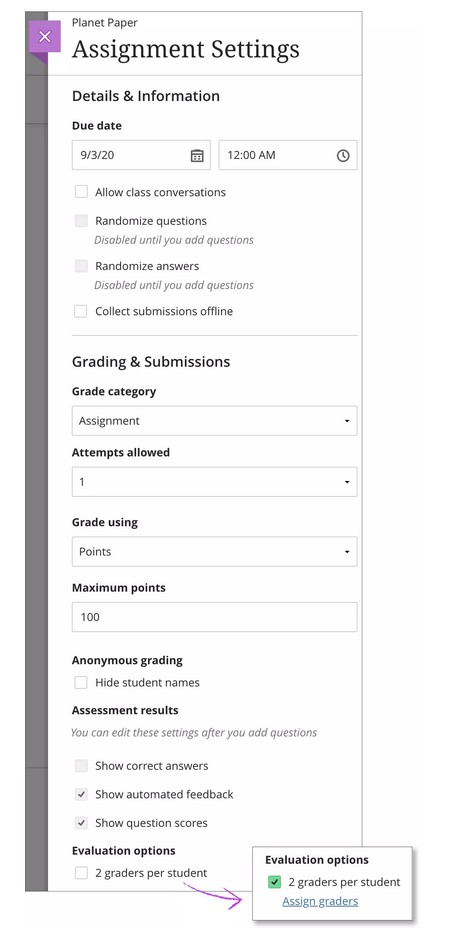
In the Assignment Settings panel, select the check box for Two graders per student in the Parallel grading section.
Select the Assign graders link that appears. On the Assign Graders page, you can choose your graders and reconcilers. [view screenshot]
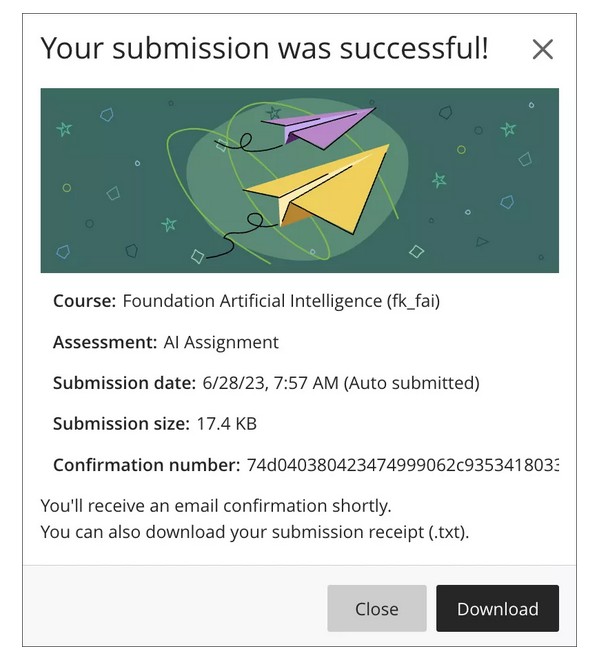
When a student submits an assignment or test, a window appears with a submission confirmation number. Students can download a copy of the receipt directly from the window. They also receive a copy of their submission receipt via an automatic email confirmation. Students are encouraged to save their submission receipts to verify they submitted their work.
You can look up and view the receipt confirmation number for each attempt a student makes. Receipts display the following information:
- Course name and ID.
- Assessment name..
- Assessment grade.
- Number of attempts for an assessment.
- The student who submitted the assessment.
- Size of any file included with the submission, which gives you an idea of what the student attached.
- Submission date and time stamp. If the assessment was submitted late, it's indicated here.
- Auto submit indicator - Appears when the assessment is automatically submitted by Learn as part of a timed assessment or the Prevent Late Submission assessment setting. [view screenshot]
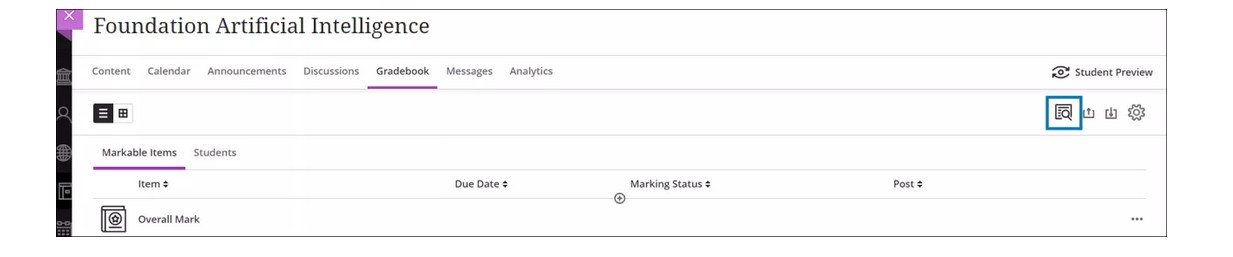
To find a submission with the receipt number in the gradebook, select the Search by submission receipt number button at the top right of the Gradebook. [view screenshot]
In the receipt search panel, enter the submission receipt number provided to you by the student to look up the corresponding submission.
If a submission is found, select it to open the grading page for the submission. The receipt number also appears on the grading page.
If no submission is found, you will see the message “Sorry! No submission receipt was found for that number. Check the receipt number and try again.”
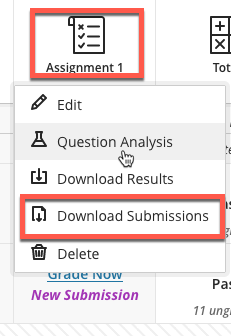
Instructors can download all student submissions for a single assignment or quiz results from the Blackboard Gradebook to review them offline. It will download submissions into a zip file and you can print or grade them.
Assignments
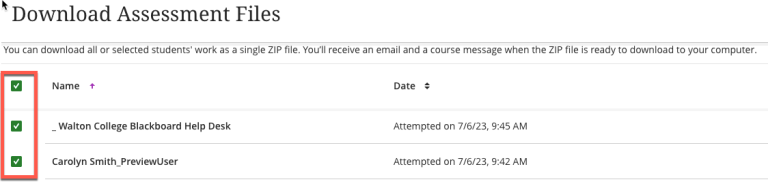
- Navigate to your Blackboard Ultra course.
- Click Gradebook on the top menu. [view screenshot]
- Find the Assignment and Click Download Submissions. [view screenshot]
- Select All or Individual Students to Download. [view screenshot]
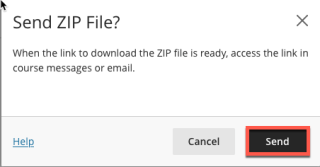
- Click Create Zip File and Send. [view screenshot]
- You will receive an email with the link to download the submissions. Click Download Now. [view screenshot]
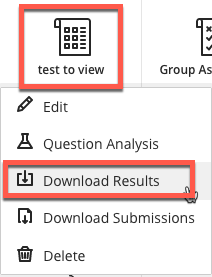
Tests and Quizzes Download Results.
You can download the Test & Quiz results in Excel.
- Navigate to your course.
- Click Gradebook in the top menu. [view screenshot]
- Find the Test or Quiz and Click Download Results. [view screenshot]
- Select the File Type, Format of Results, and Attempts to Download.
- Click Download. [view screenshot]
- The format listed By Question and Student will list each question for each user in a separate row.
- Choose the format By Question and User for assessments longer than 40 questions.
- You can also decide which attempts to download.
- All attempts for this item may be downloaded under All Attempts.
- Downloading Grade Attempts will just include the attempt that is being graded for that assessment.
- For example, if the grading option is set to Last Attempt then only the last attempt will be provided. If the Grading option is set to Average, all attempts will be provided.
- Open the file using your computer’s spreadsheet program. If you receive a warning before opening the file please click Yes to allow the file to open.
Flexible grading is an optimized grading experience that provides instructors with the flexibility to grade in their preferred style.
With flexible grading, you can:
- Easily review the status of your grading tasks and prioritize your time where it is needed most.
- Provide inline, multimedia feedback directly to students.
- Easily access grading rubrics, anti-plagiarism checkers, and more as you work through your grading tasks.
Watch a video about Grade Assignments with Flexible Grading
You can make changes to existing assignments and change where they appear on your Course Content page. Be aware that if you change an existing assignment that students can access, some students may have started their submissions. You can't change the grading schema if you've already started grading.
Select the Move button in an assignment's row and move it to a new location. You can also move an assignment into a folder.
You can use your keyboard to move an assignment.
- Tab to an item's Move button.
- Press Enter to activate move mode.
- Use the arrow keys to choose a location.
- Press Enter to drop the item in the new location.
You can delete an assignment from your course and if no student submissions exist, the gradebook item is also deleted. For assignments with submissions, you must confirm that you want to permanently remove the assignment, all submissions, and grades from your course.
Or, hide the assignment from students to preserve the submissions and the scores in the Gradebook. Students can't access hidden assignments on the Course Content page or on their grades pages even if you have graded submissions.
You can allow more than one attempt for an assignment. This is a way to permit students to send in drafts and earn credit on improvements. Allowing multiple attempts can also allow students to self-correct if they forget to attach their document or upload the wrong document initially. Be sure to inform students which of your assignments allow multiple attempts, and what the expectations and grading policies are for each attempt.
Example: Research Paper Assignments
In one assignment with four attempts, students can submit file attachments for the following items:
- Outlines
- Bibliographies
- Rough drafts
- Final papers
You can provide feedback at each stage. You can assign grades as each attempt is submitted, but only use the grade for the final paper as the assignment's grade.
Alternatively, if you want to provide four grades—one for each portion of the research paper process—you can create separate assignments for each. You can set up a calculated column in the Grade Center to add the points of each assignment to produce a final score for the research paper.
You can also allow groups to submit their assignments more than once, and receive feedback and a grade for each submission.
Multiple Attempts Options
When you create an assignment, you decide how many attempts to allow and which score to use in the Grade Center.
For example, if you allow three attempts, you can select which grade will be used for the assignment:
- Last Graded Attempt—the default
- Highest Grade
- Lowest Grade
- First Graded Attempt
- Average of Graded Attempts
Grade Multiple Attempts
If you allowed multiple attempts for an assignment, and a student has submitted all attempts, they all appear in the grade cell's contextual menu.
If an attempt is ungraded, the exclamation mark remains in the cell along with the scores for attempts you graded.
Allow Additional Attempts
If a student has submitted the maximum number of attempts for an assignment, you can allow an additional attempt. In the Grade Center, access a cell's contextual menu and click View Grade Details.
Allow Additional Attempt only appears if a student has already submitted the maximum number of attempts allowed for that assignment. You can continue to offer opportunities to resubmit attempts each time a student reaches the maximum number. You do not have to grade previous attempts to allow a student to submit again.
Alternatively, click Ignore Attempt to ignore the attempt's score in grade calculations and not count it against the maximum number of attempts.